This strain by Barney’s Farm is a modern take on the legendary Mexican Sativa that won’t disappoint. The original landrace strain has a storied history and was a founding parent to Skunk #1 – making it the ancestor of a huge swath of our modern strains. This modern variant has a more manageable size for indoor growing and a shorter flower cycle for outdoor growing in cooler latitudes.
Easy to Grow
7 out of 10
Flowering Speed
8 out of 10
Yield
9 out of 10
Potency
8 out of 10
Pros
Medicinal uses
Perfect structure for training
Great flavor profile
Stable size and structure
Cons
Strong odor while growing
Prone to nutrient issues
The Details
We have grown quite a few of these girls over the last 5 years and it continues to be a show piece in our tents. It’s a very stable strain, showing consistency from generation to generation in height, bulk and every specimen has been strong and vigorous.
We’ve seen some issues with nutrient uptake, particularly in cooler conditions, but these were manageable with a few simple steps. In our experience, this plant seems to be particularly resistant to mites when compared to similar strains.
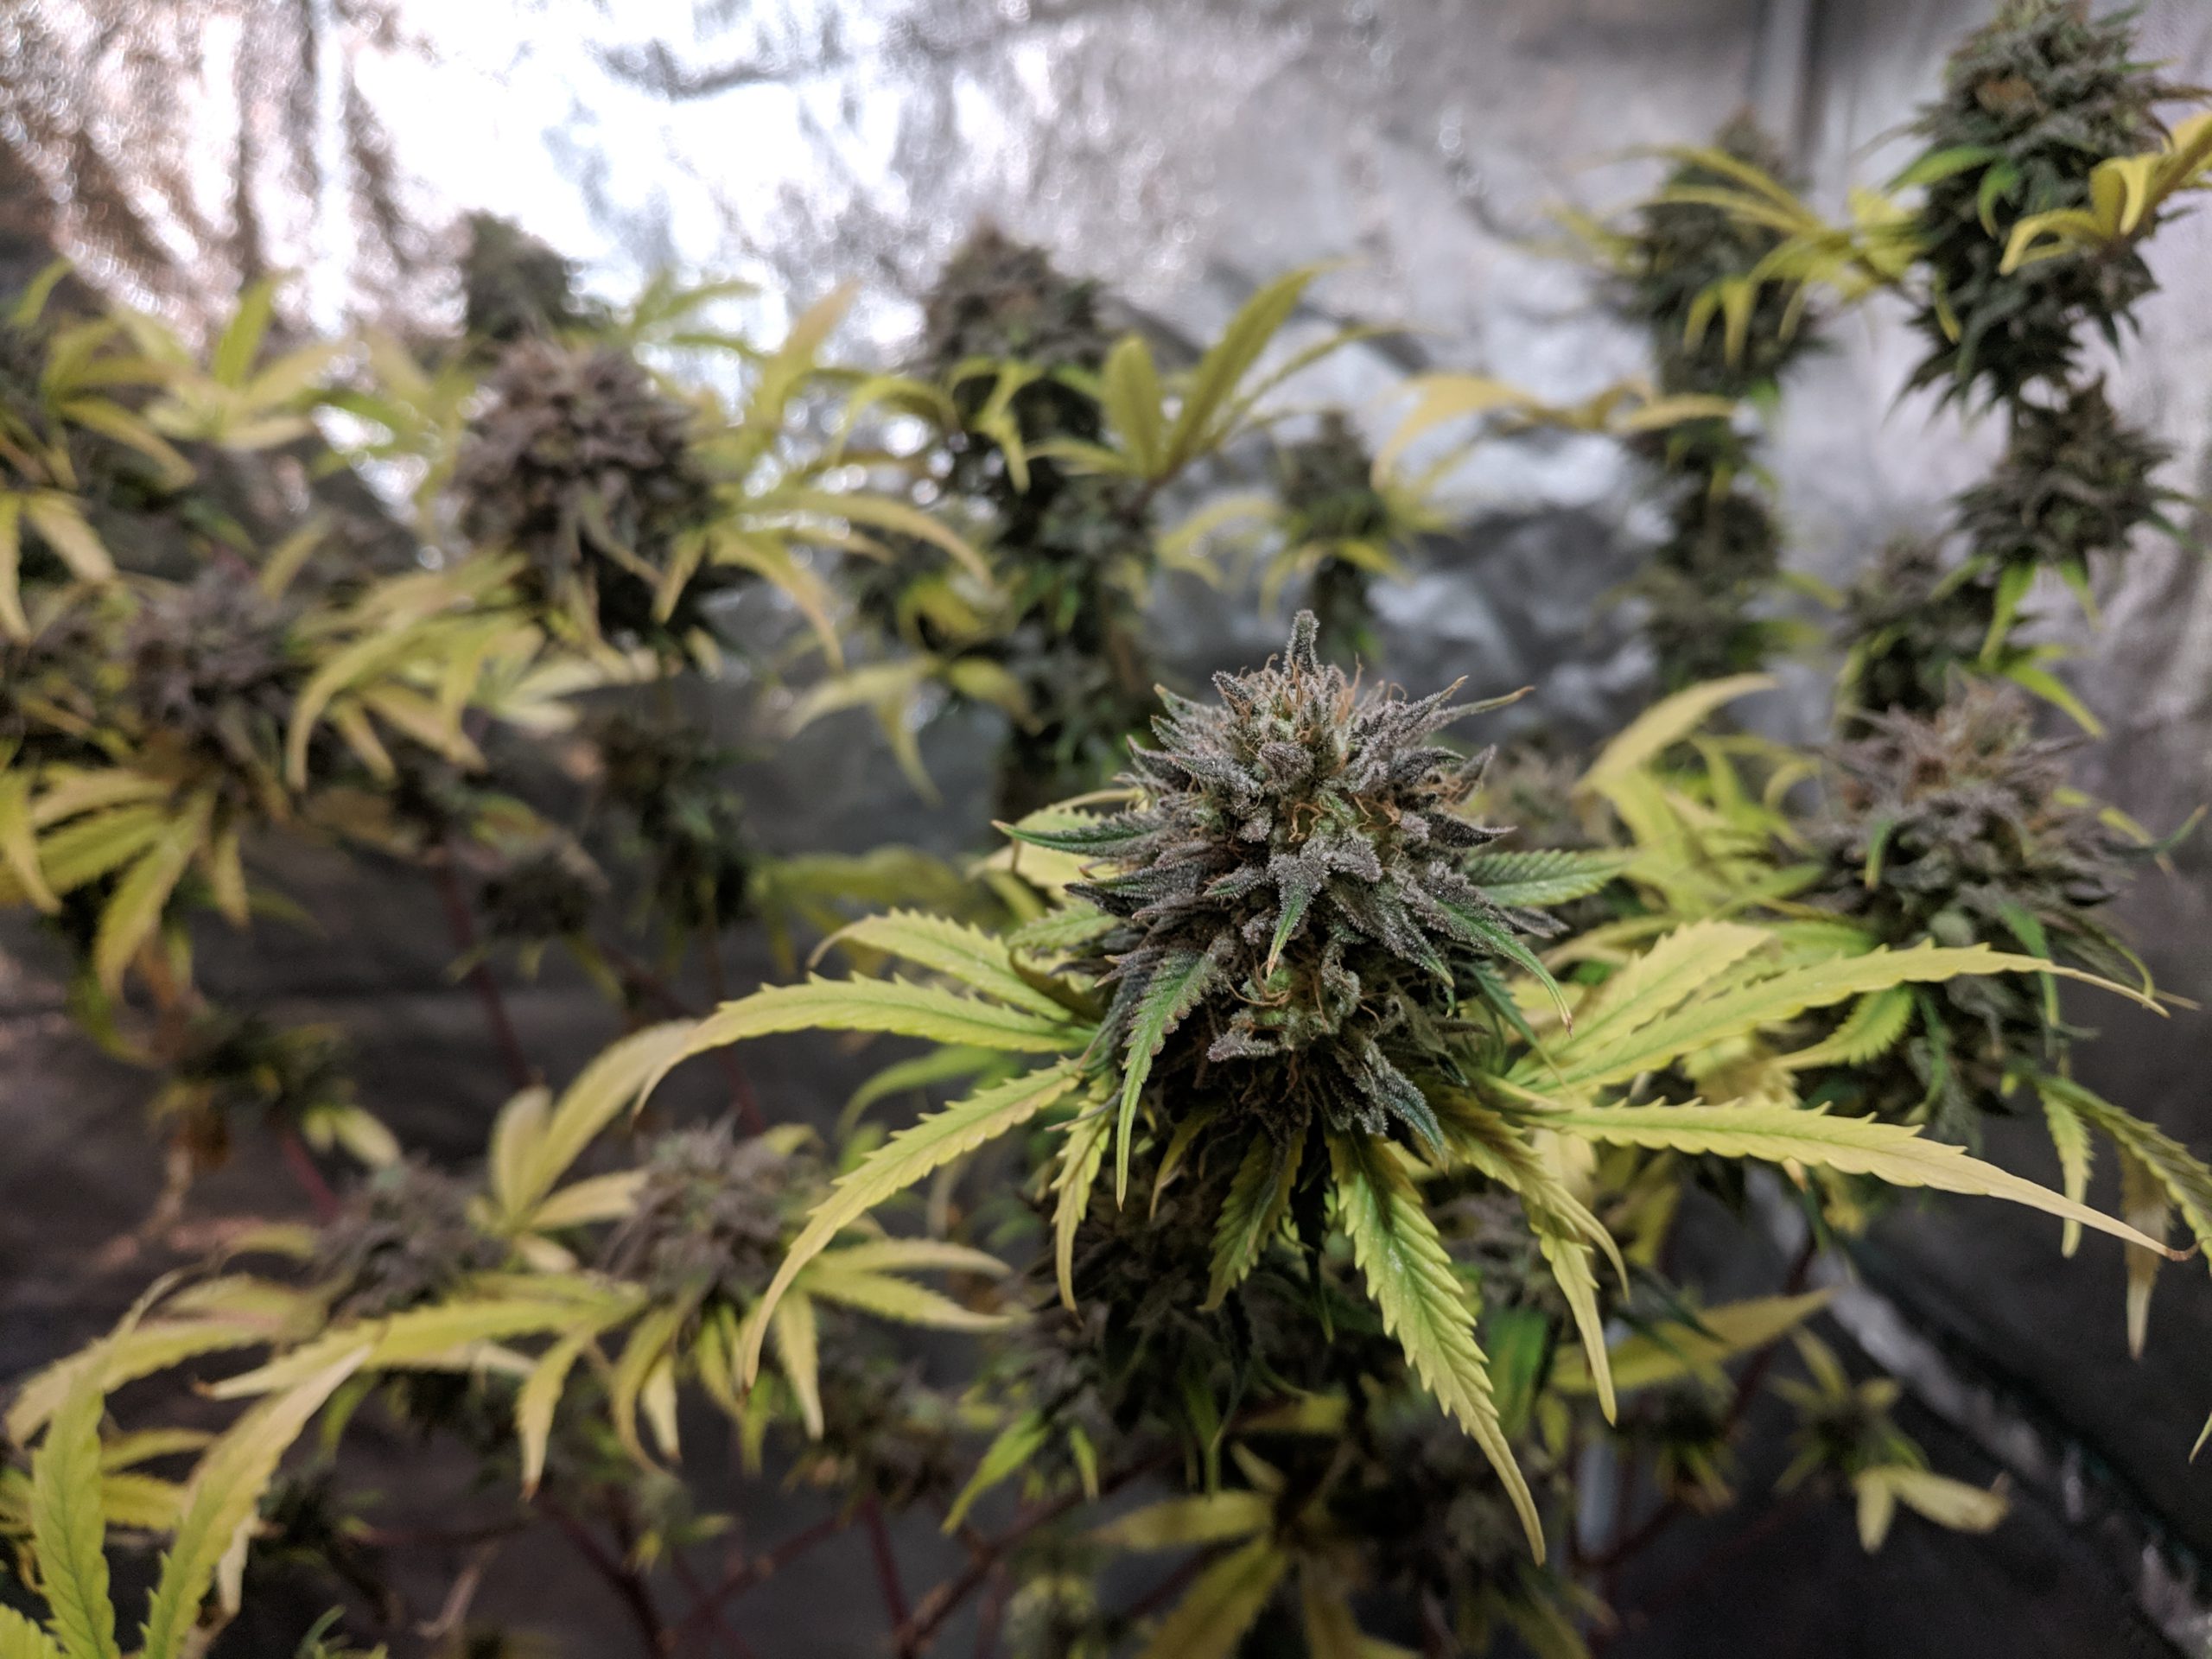
This plant is a true Sativa structurally, with lanky branches that can become overweight during flower. While their height is manageable through topping and training, they will stretch quite a bit when you first put them into flower.
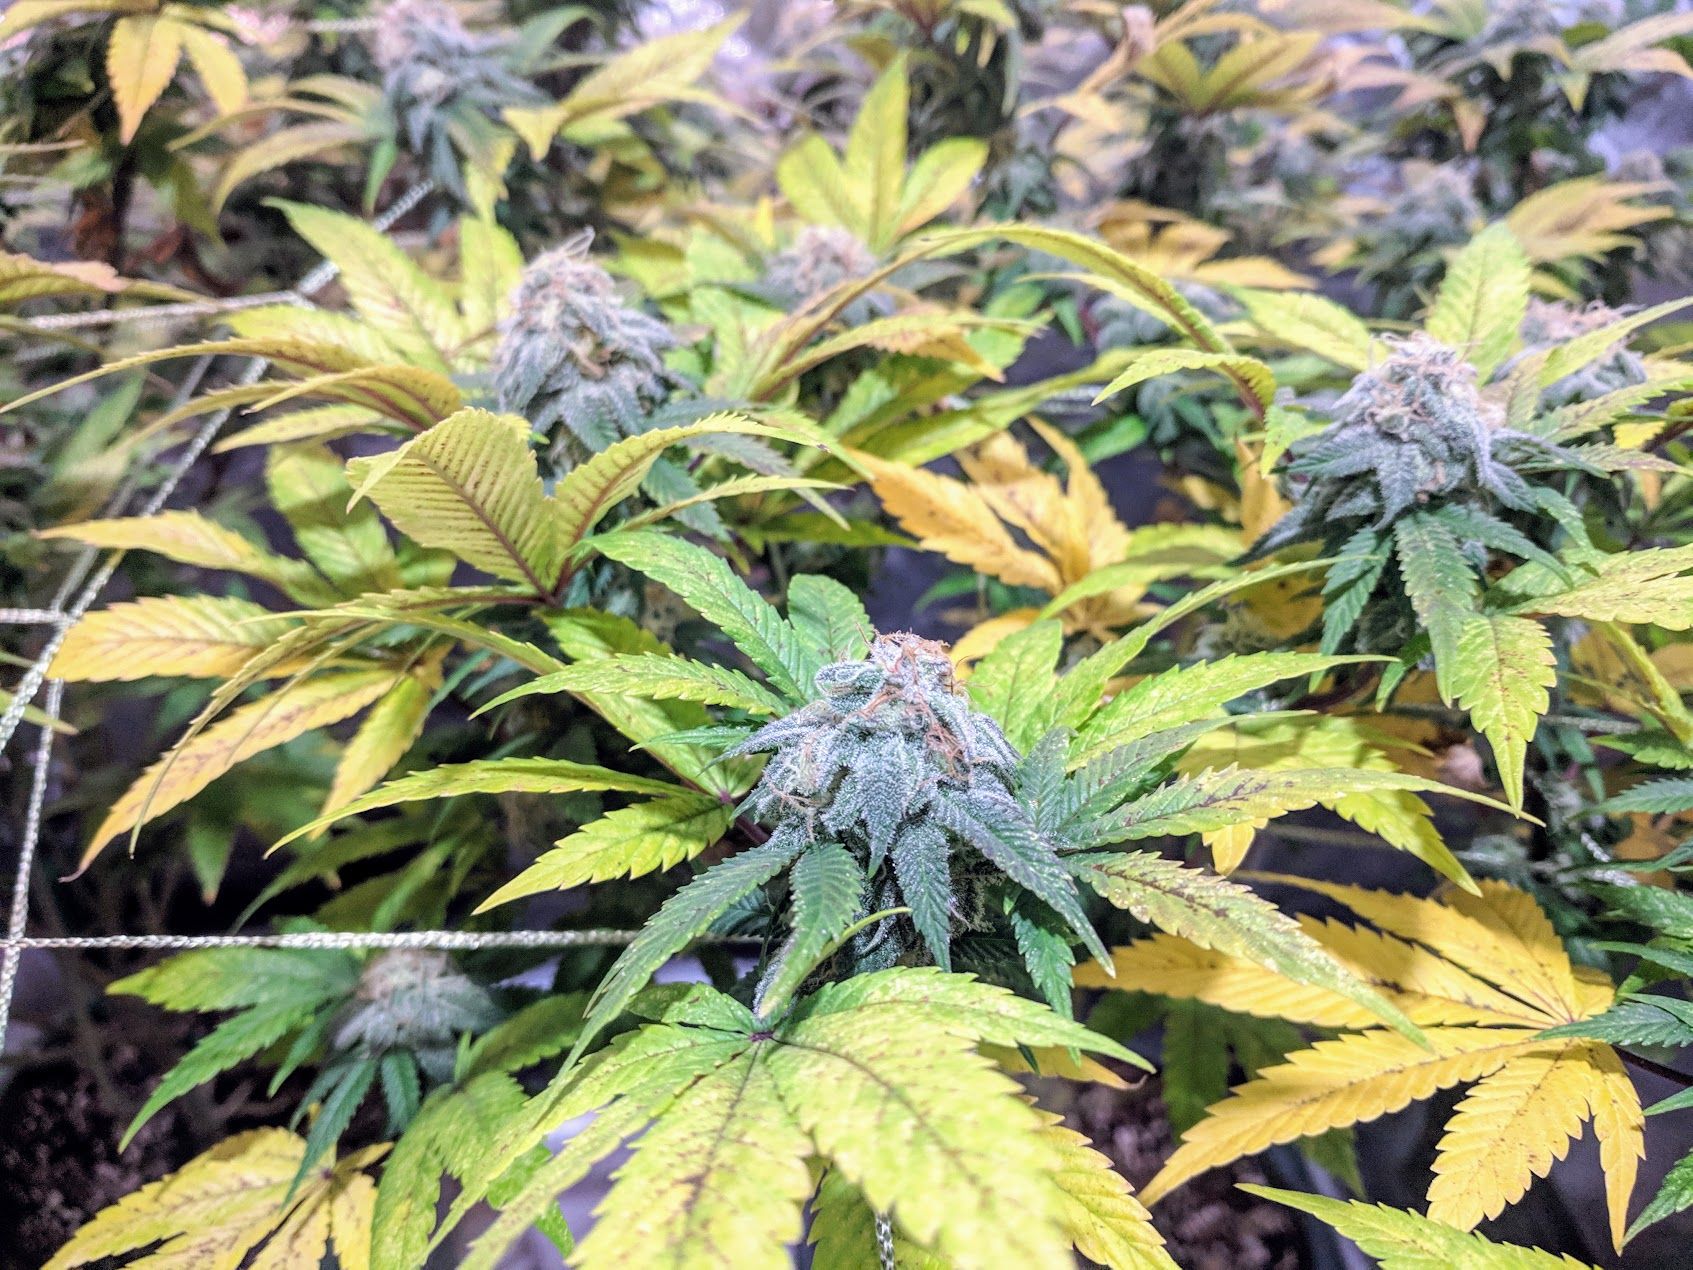
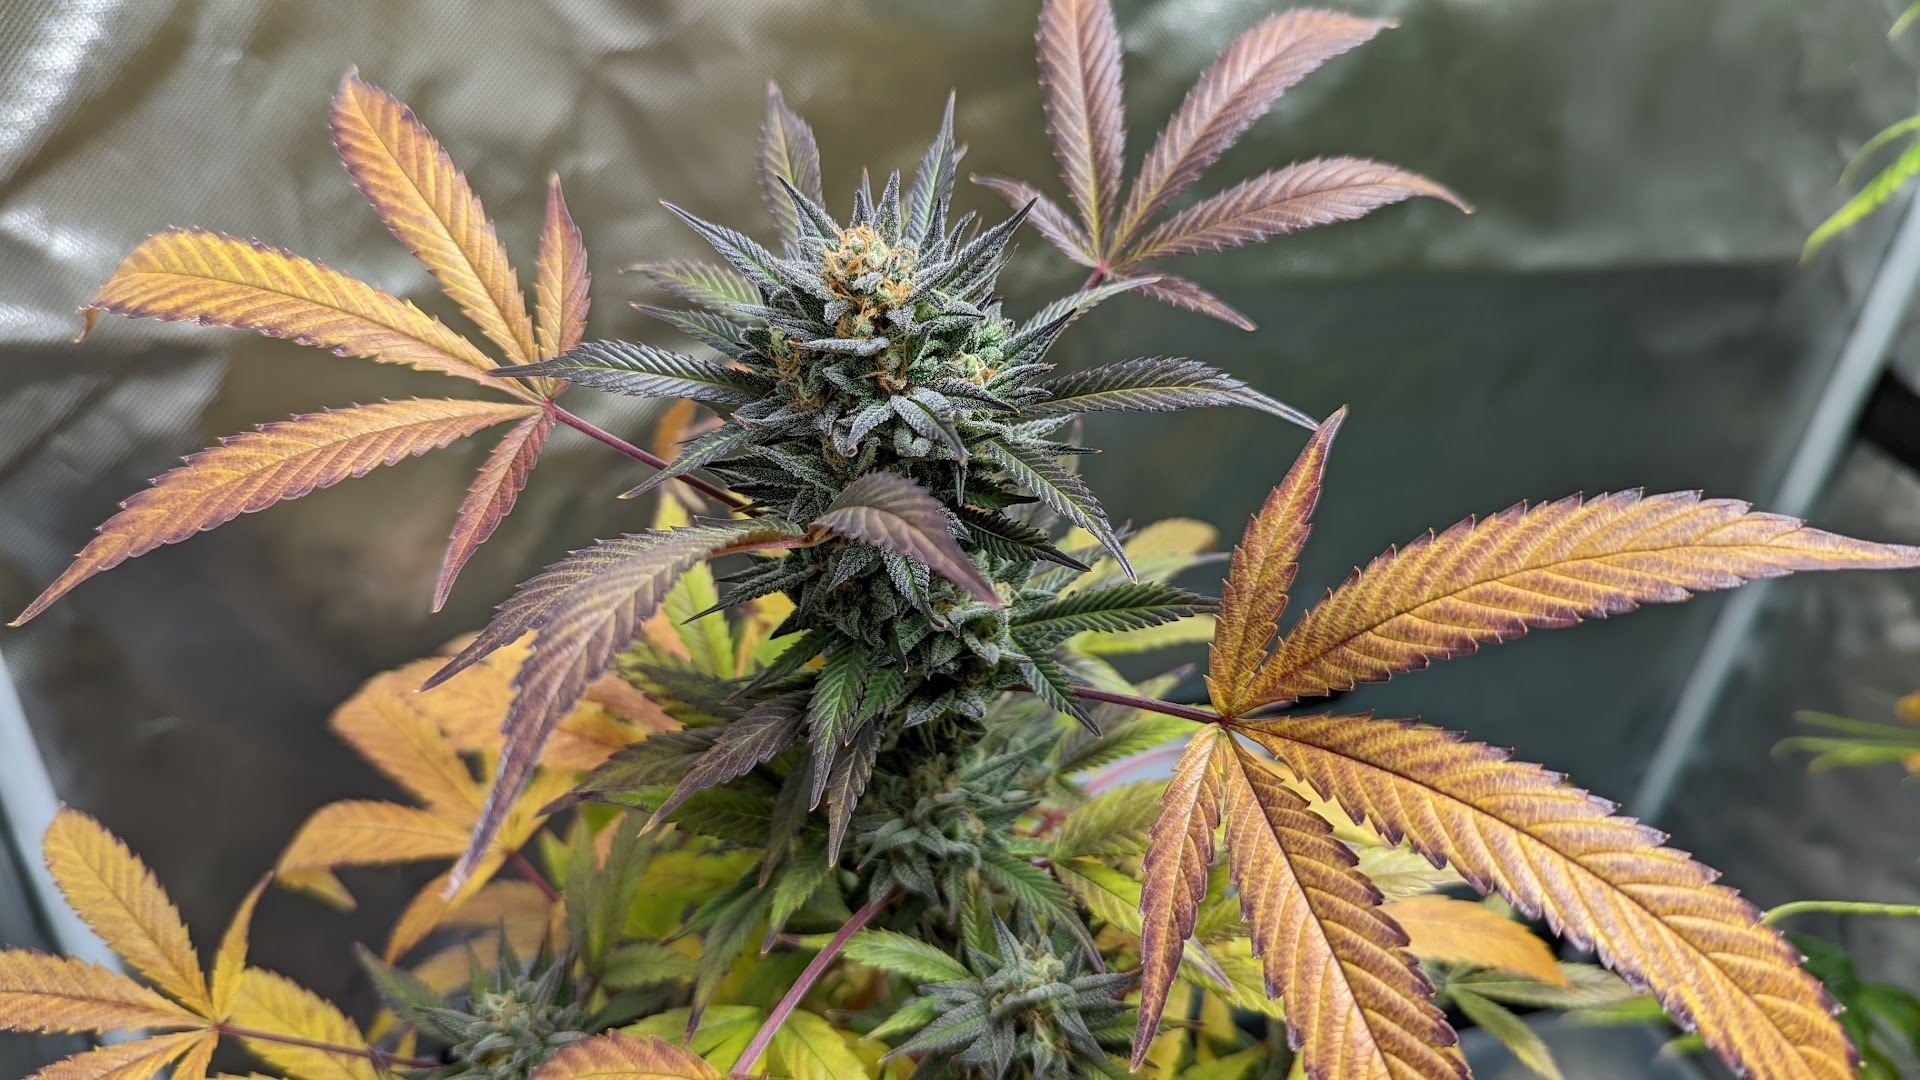
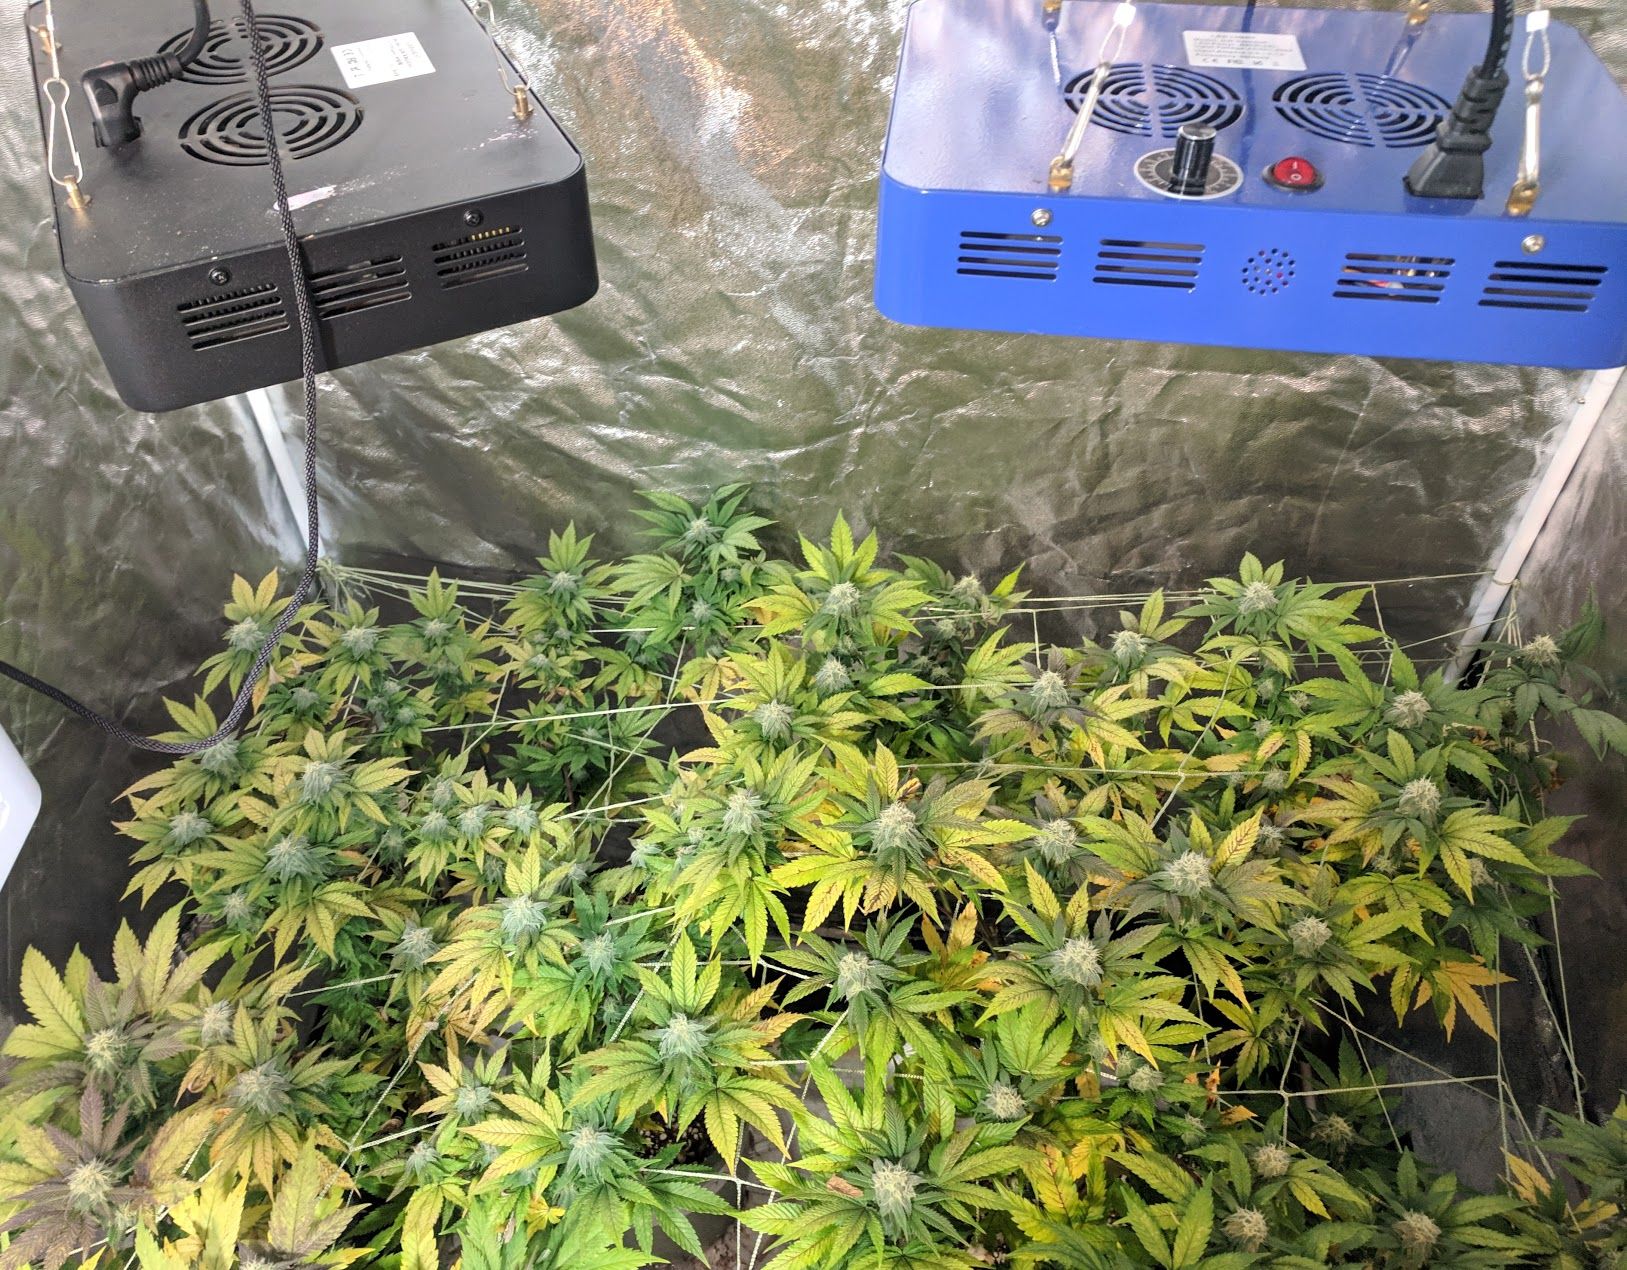
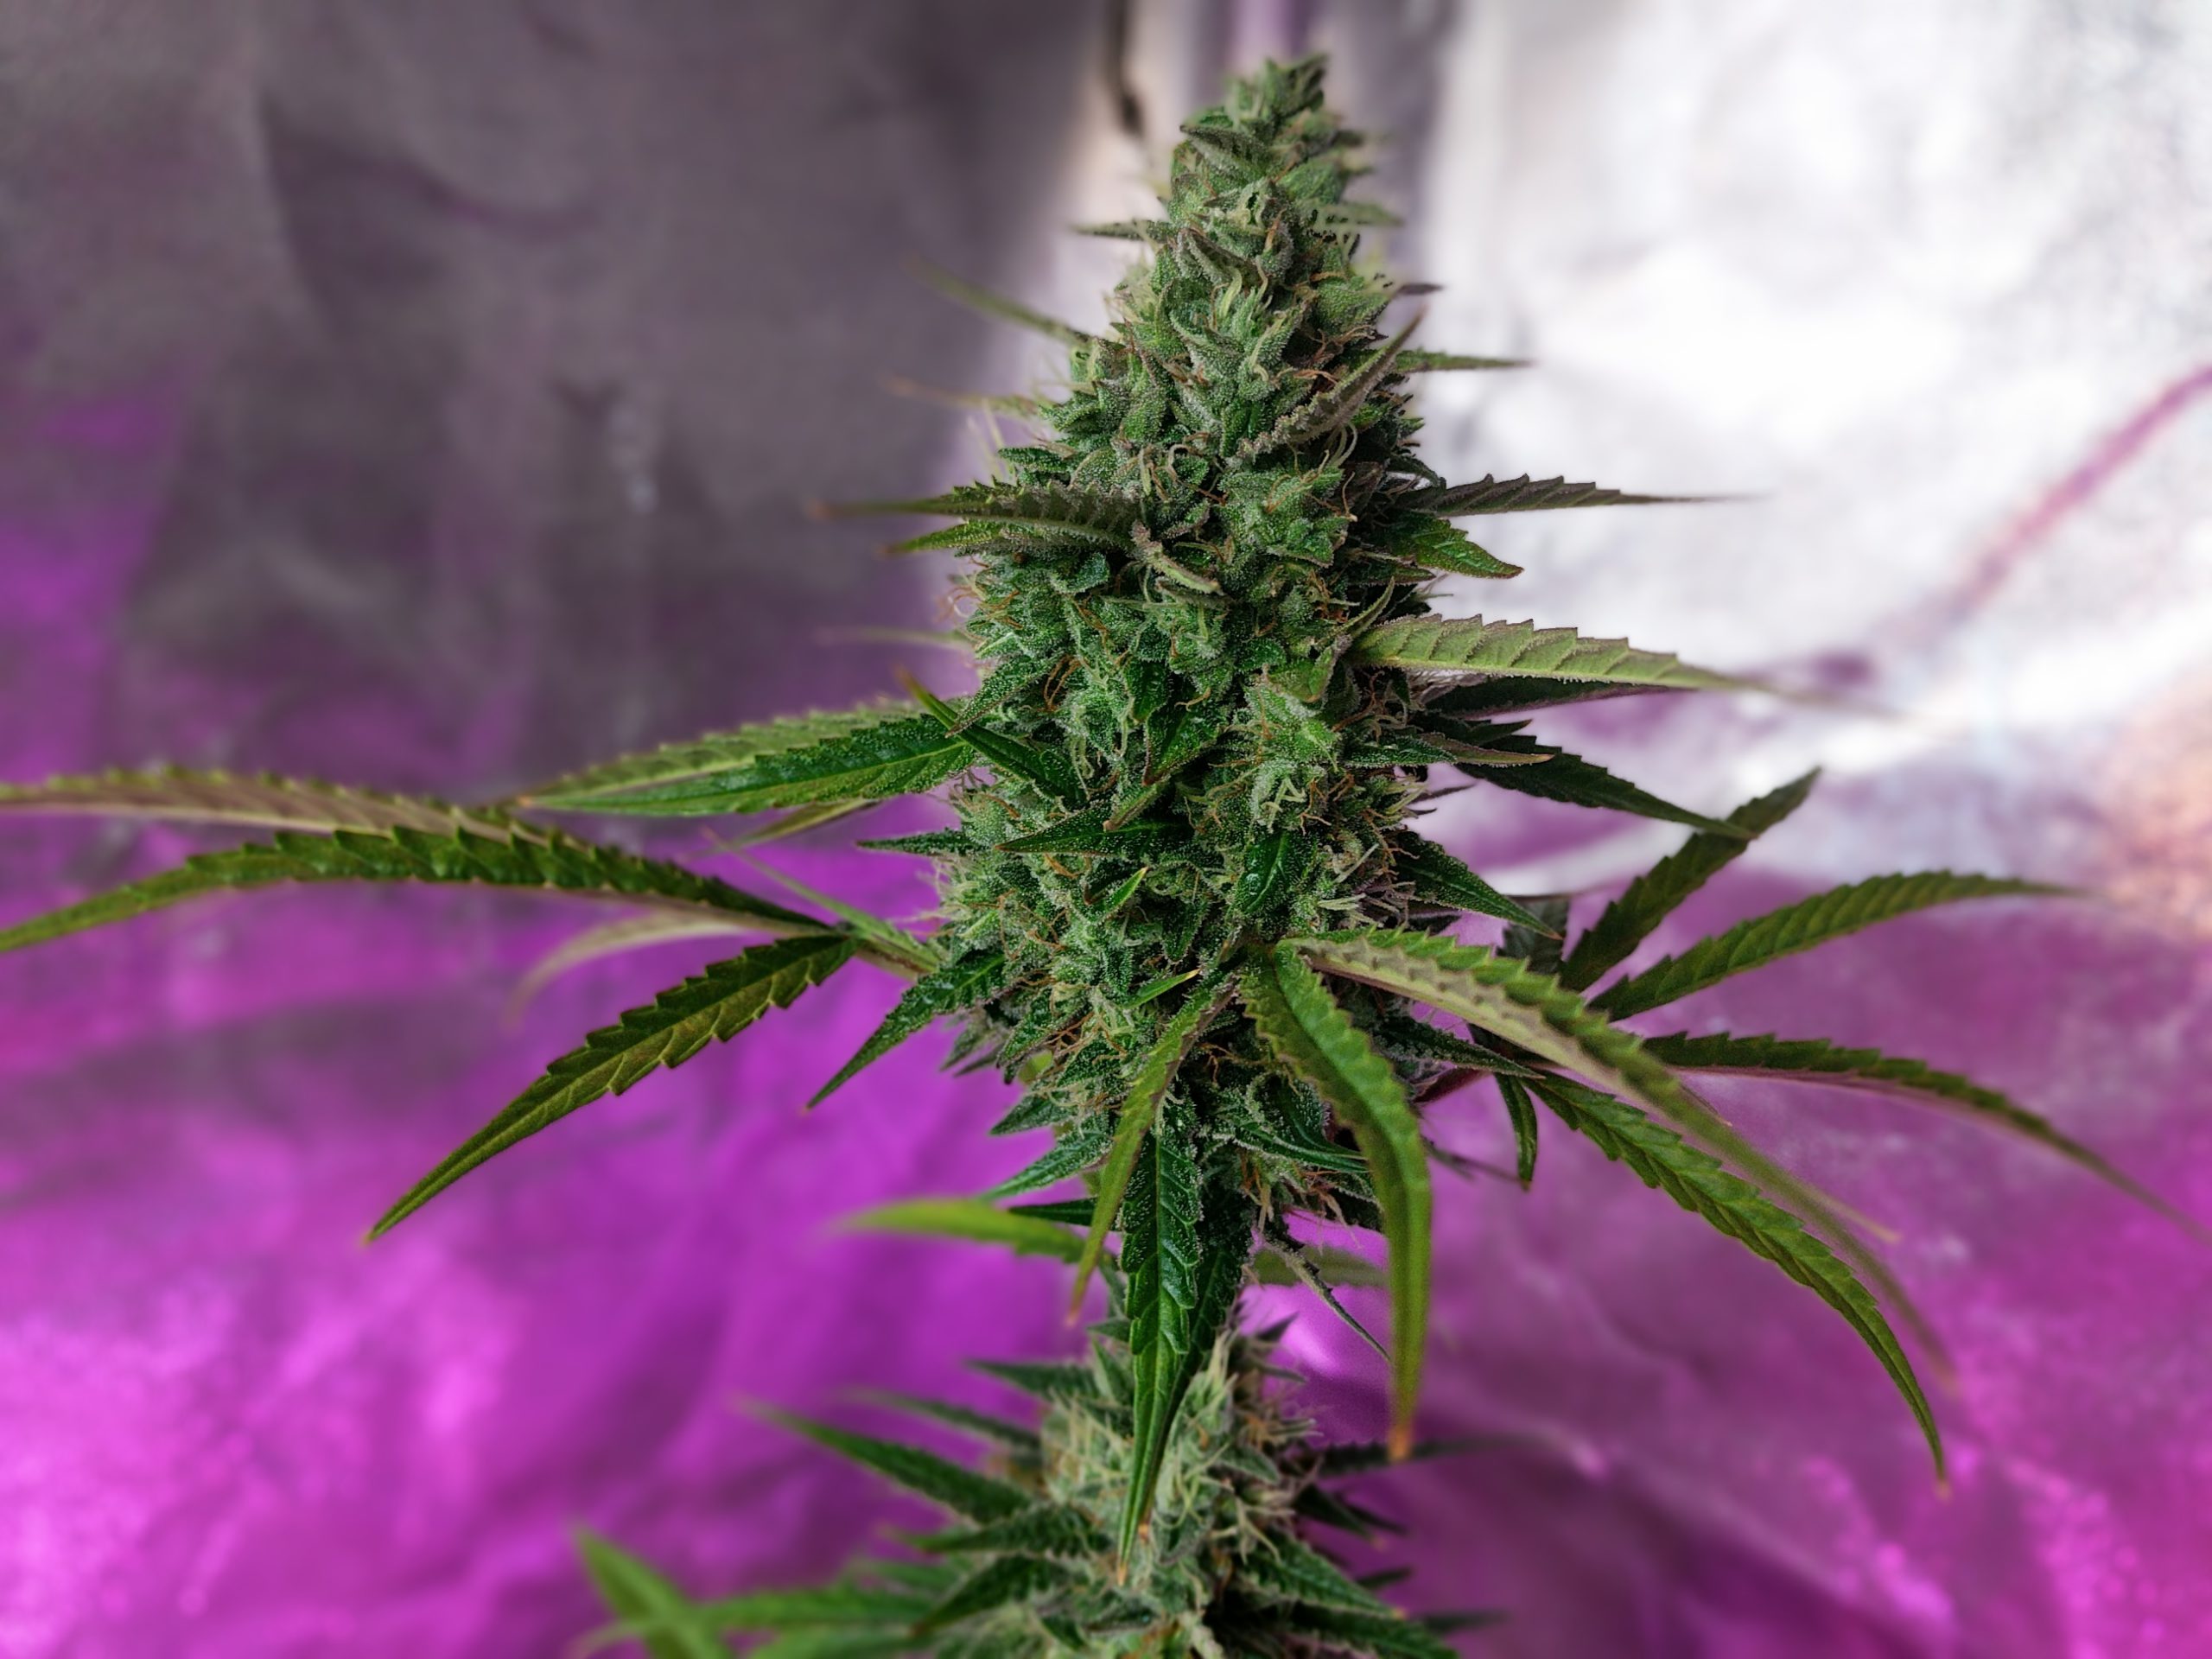
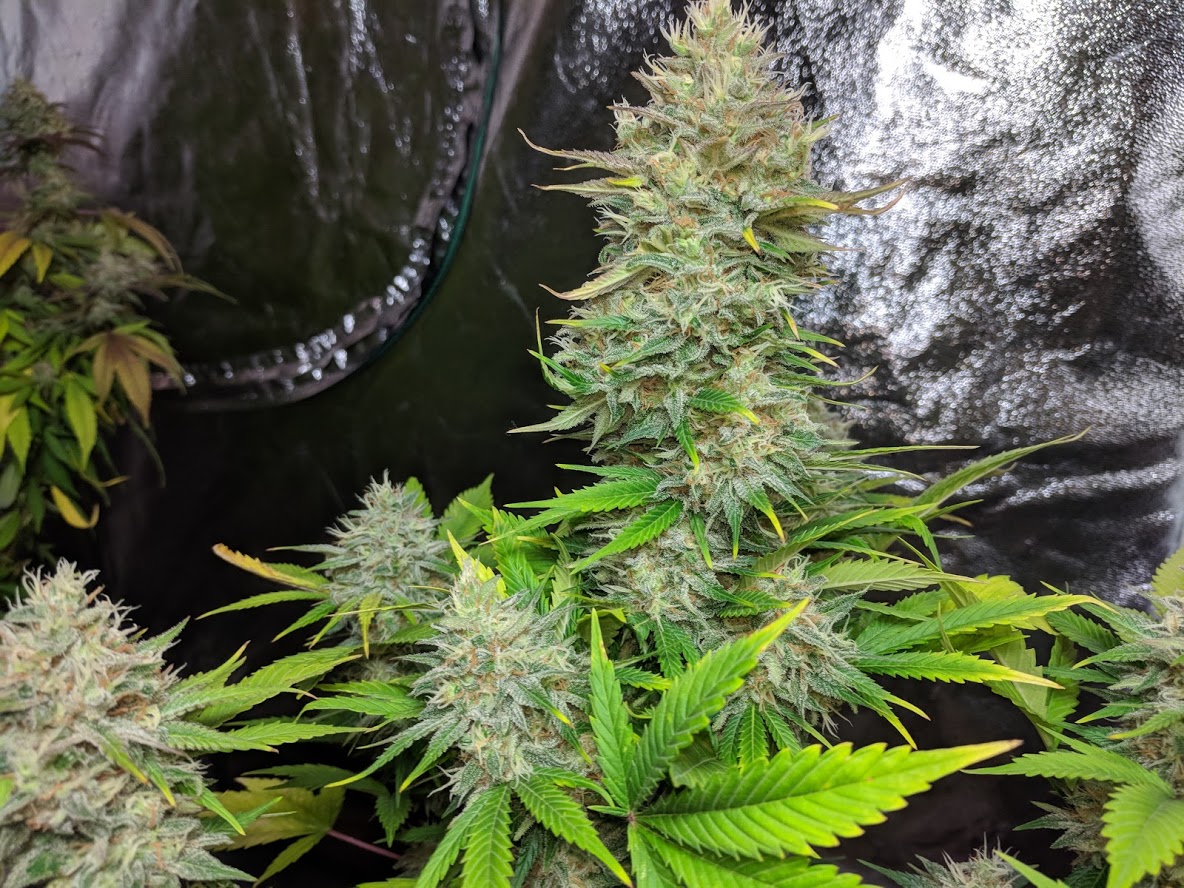
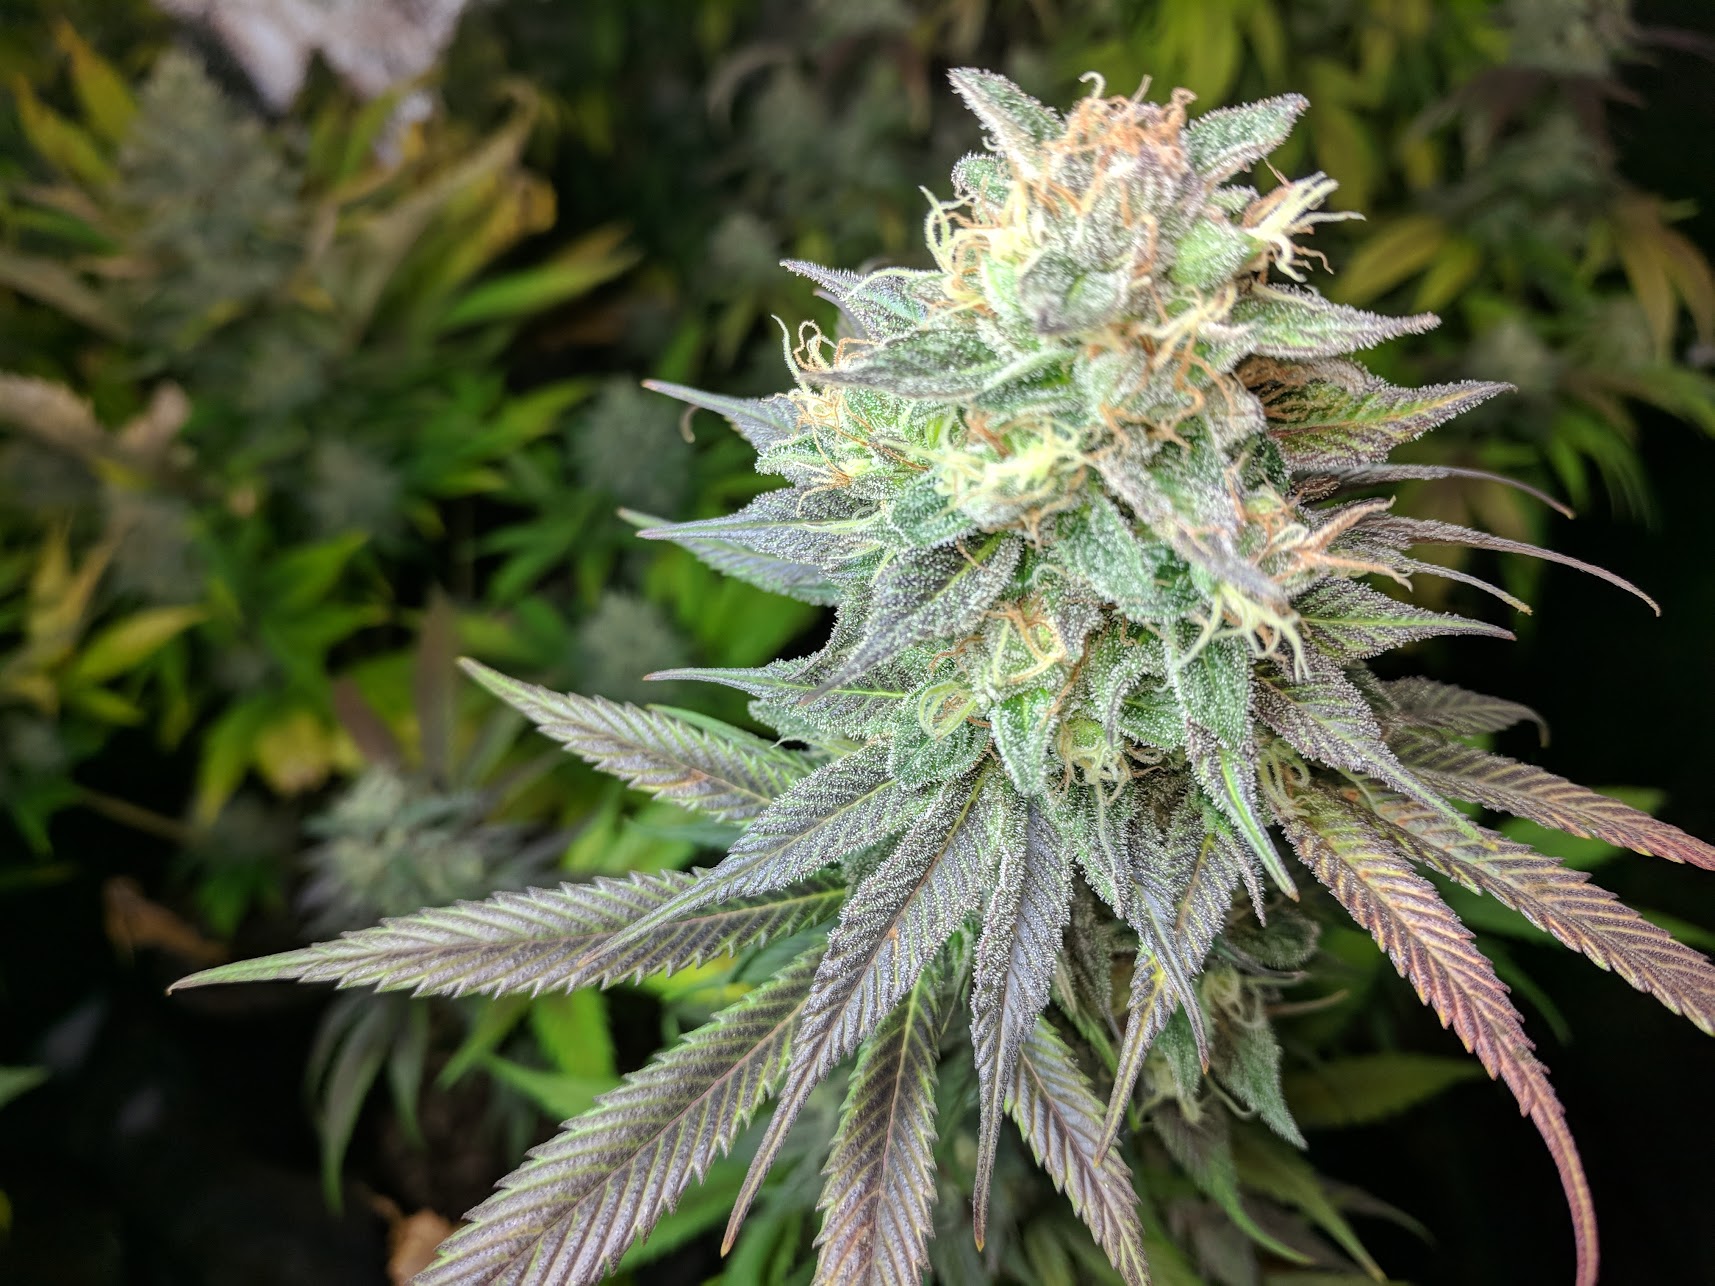
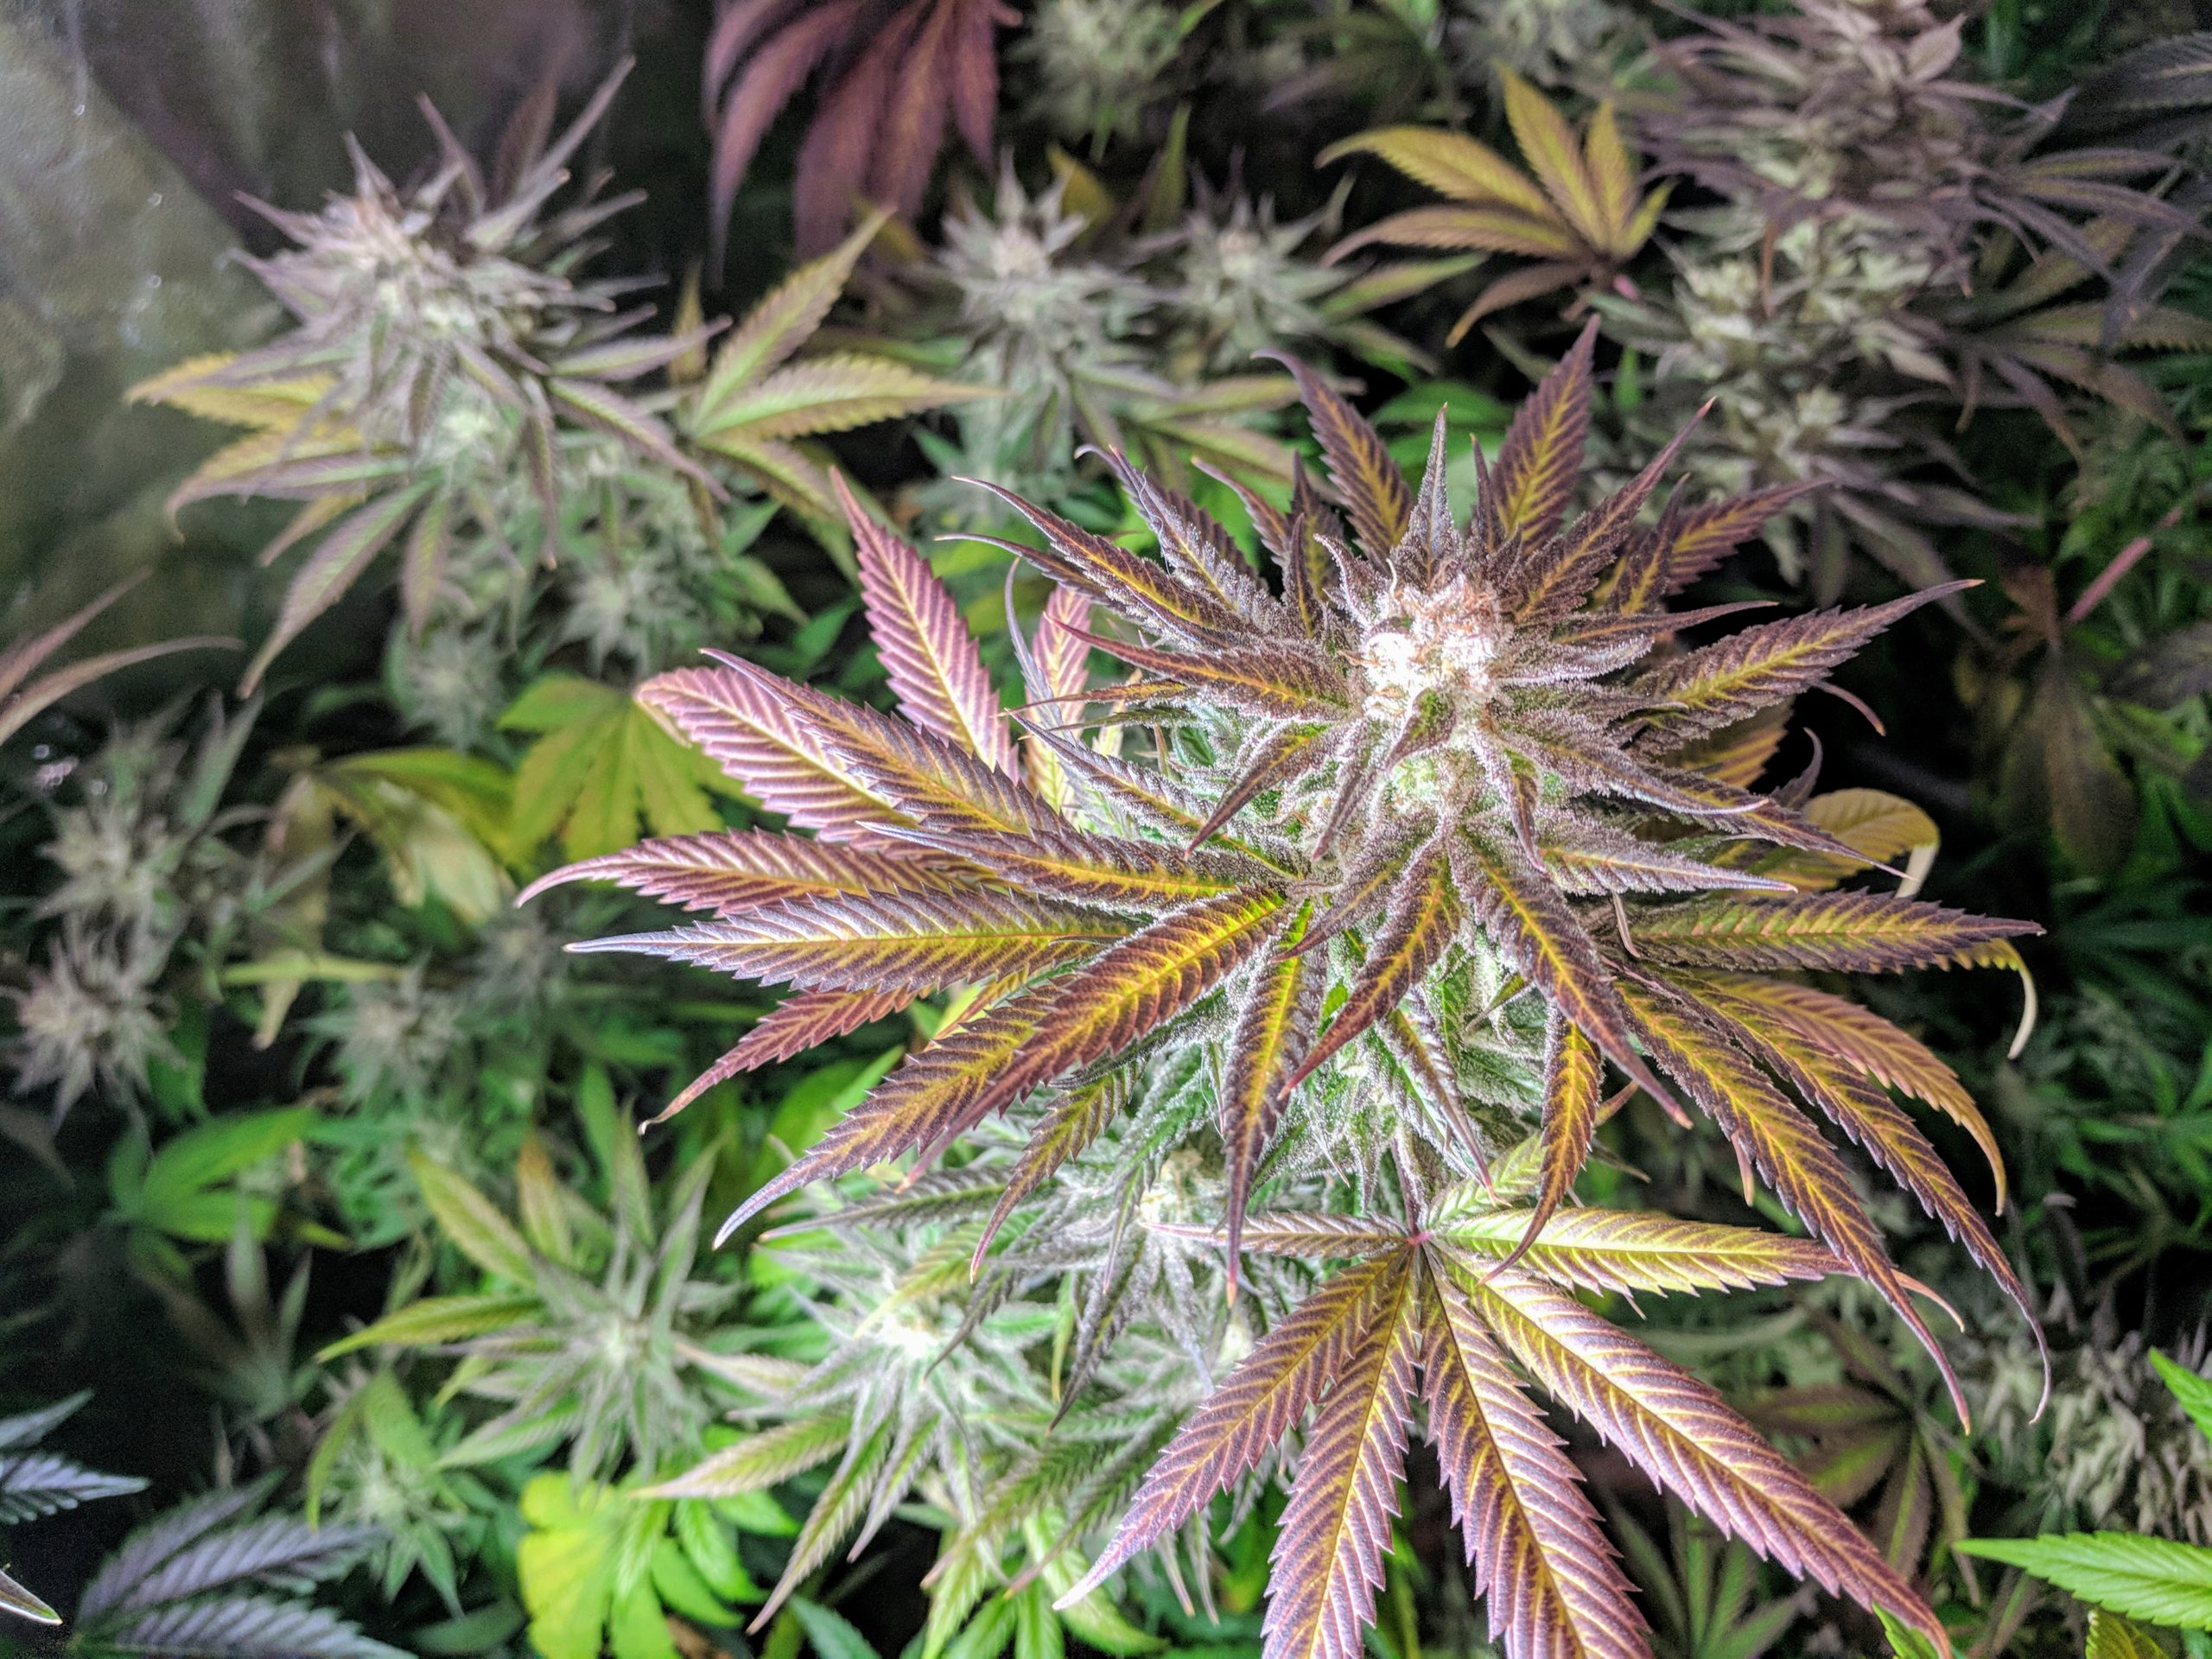
The flowers are large for a Sativa and are coated in fair amounts of resin. Flowering takes between 60 and 70 days and the leaves turn golden in late flower, just like the legends say.
Easy to Grow?
This plant has a medium difficulty level because it can reach heights over 210cm (7 ft) outdoors and requires height management to grow indoors. We have successfully used topping and training as well as screen-of-green (ScoG) methods to make the best use of indoor space.
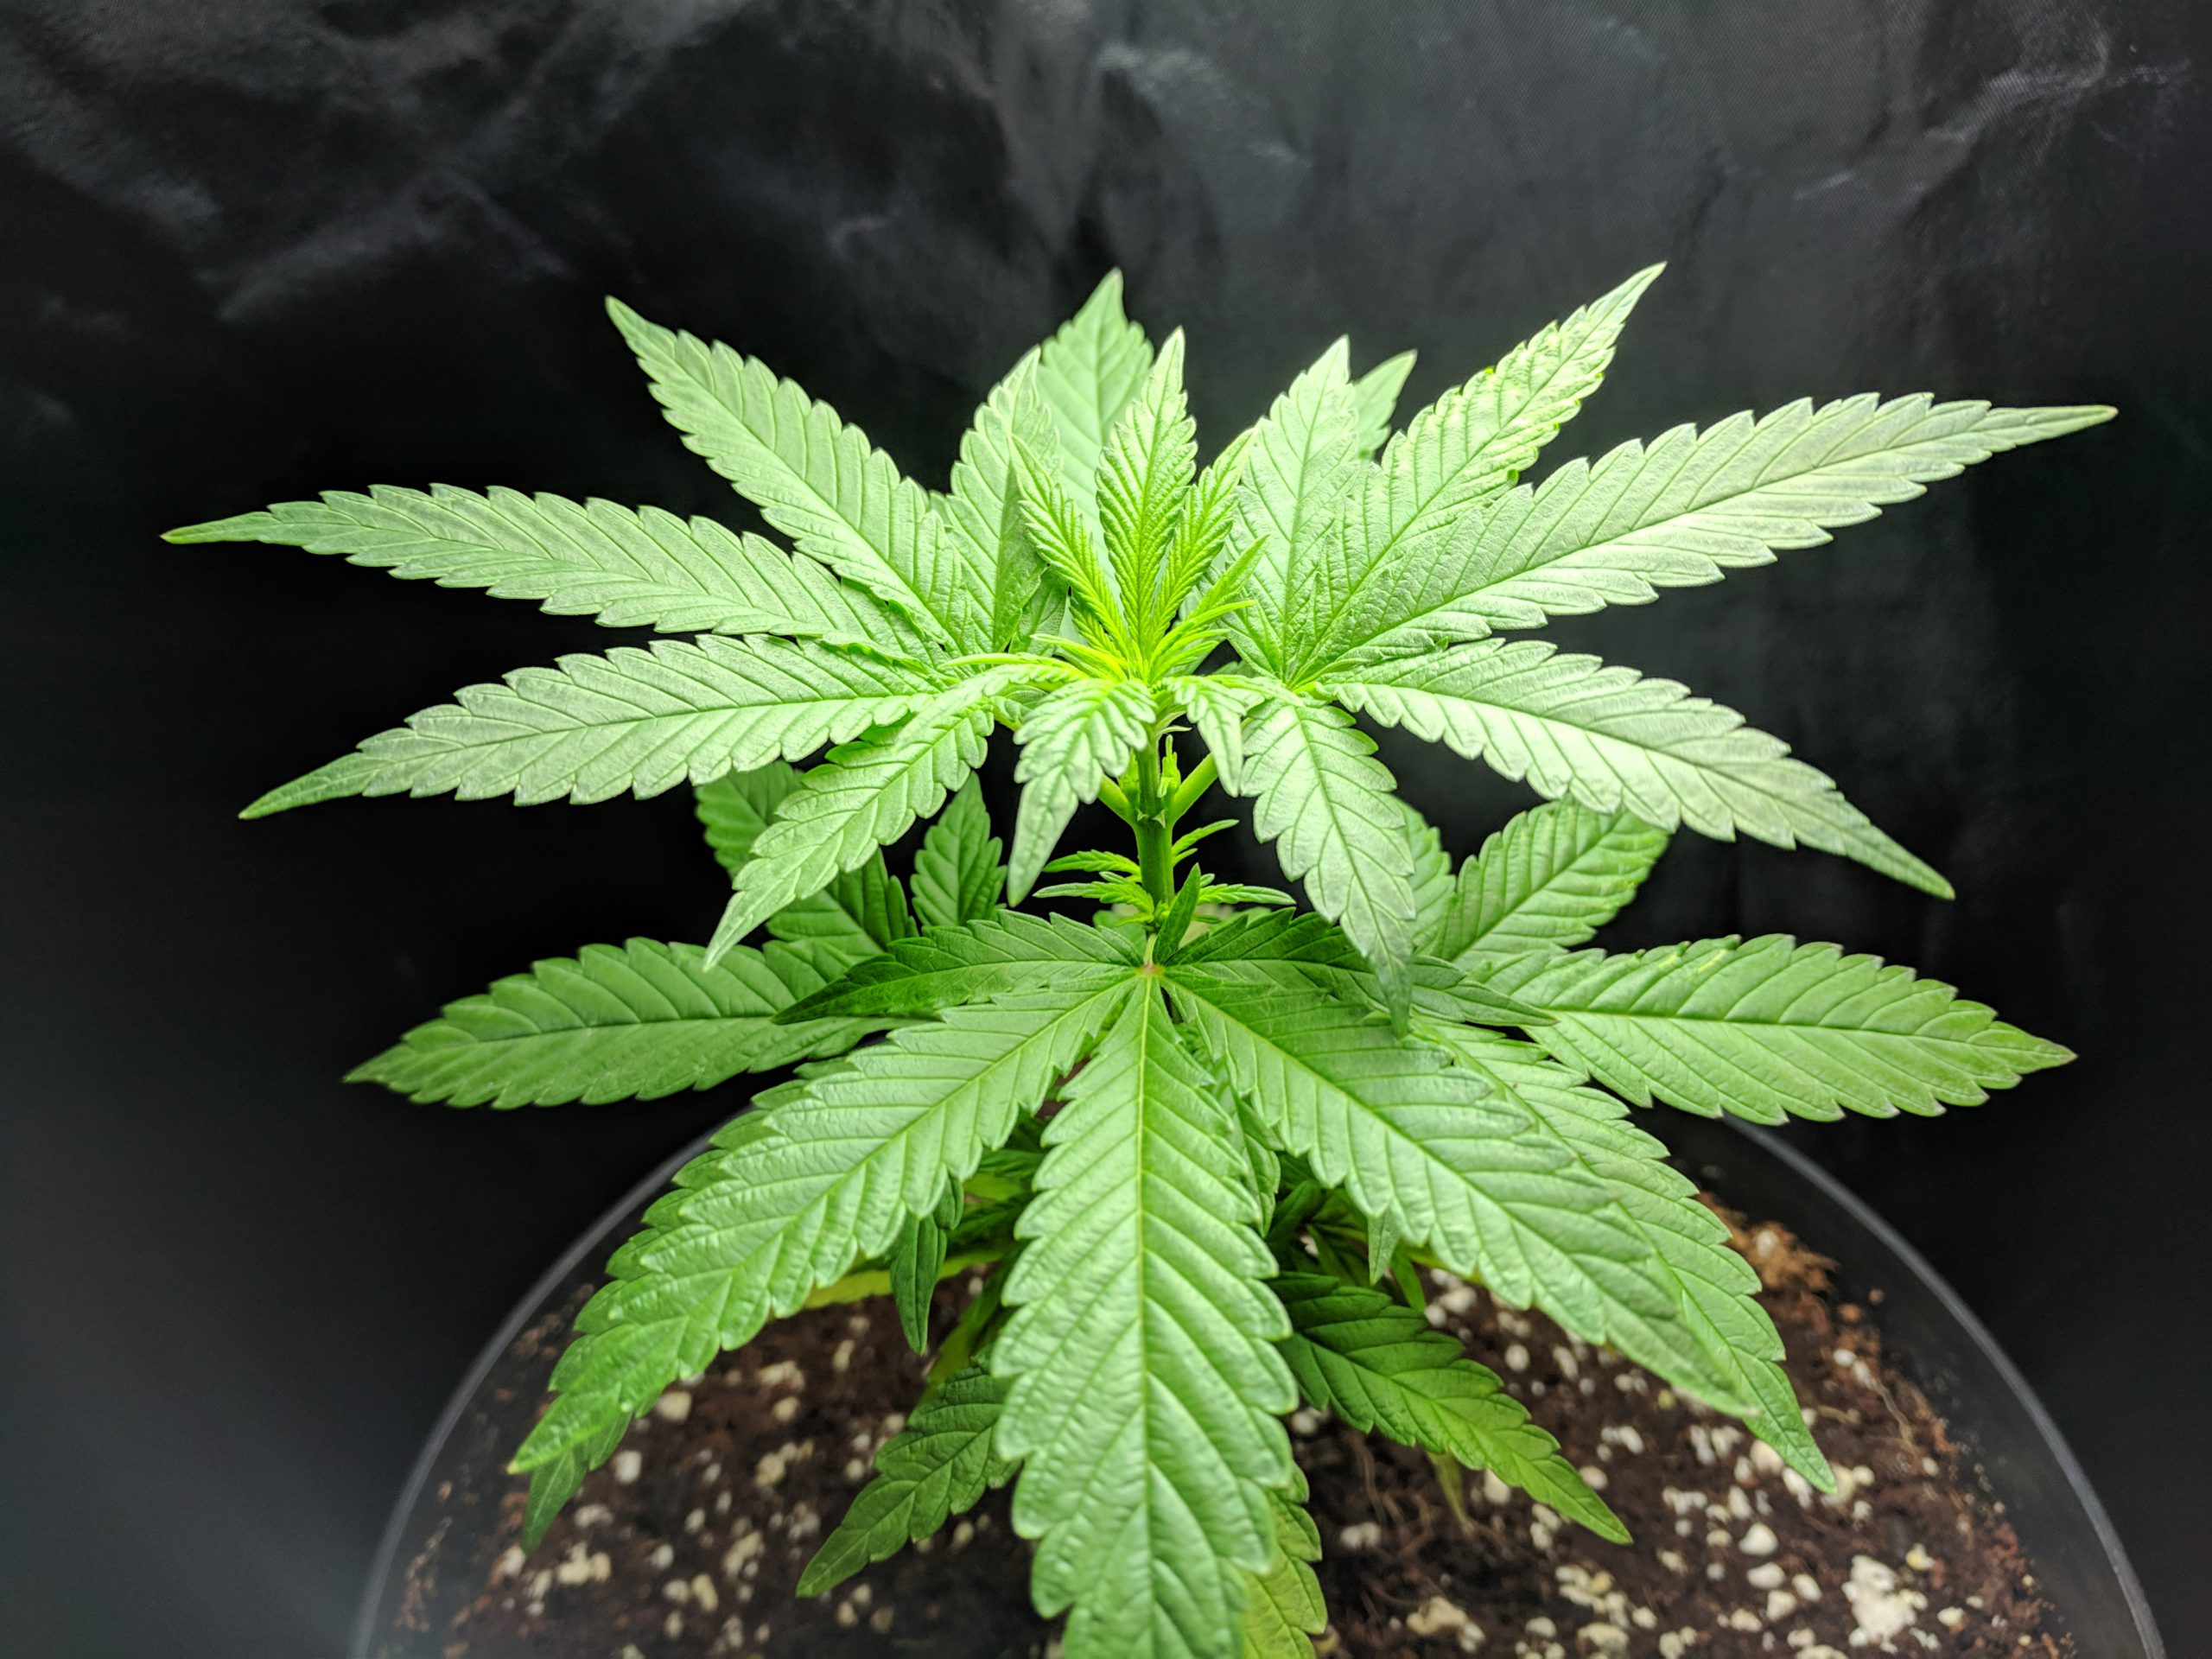
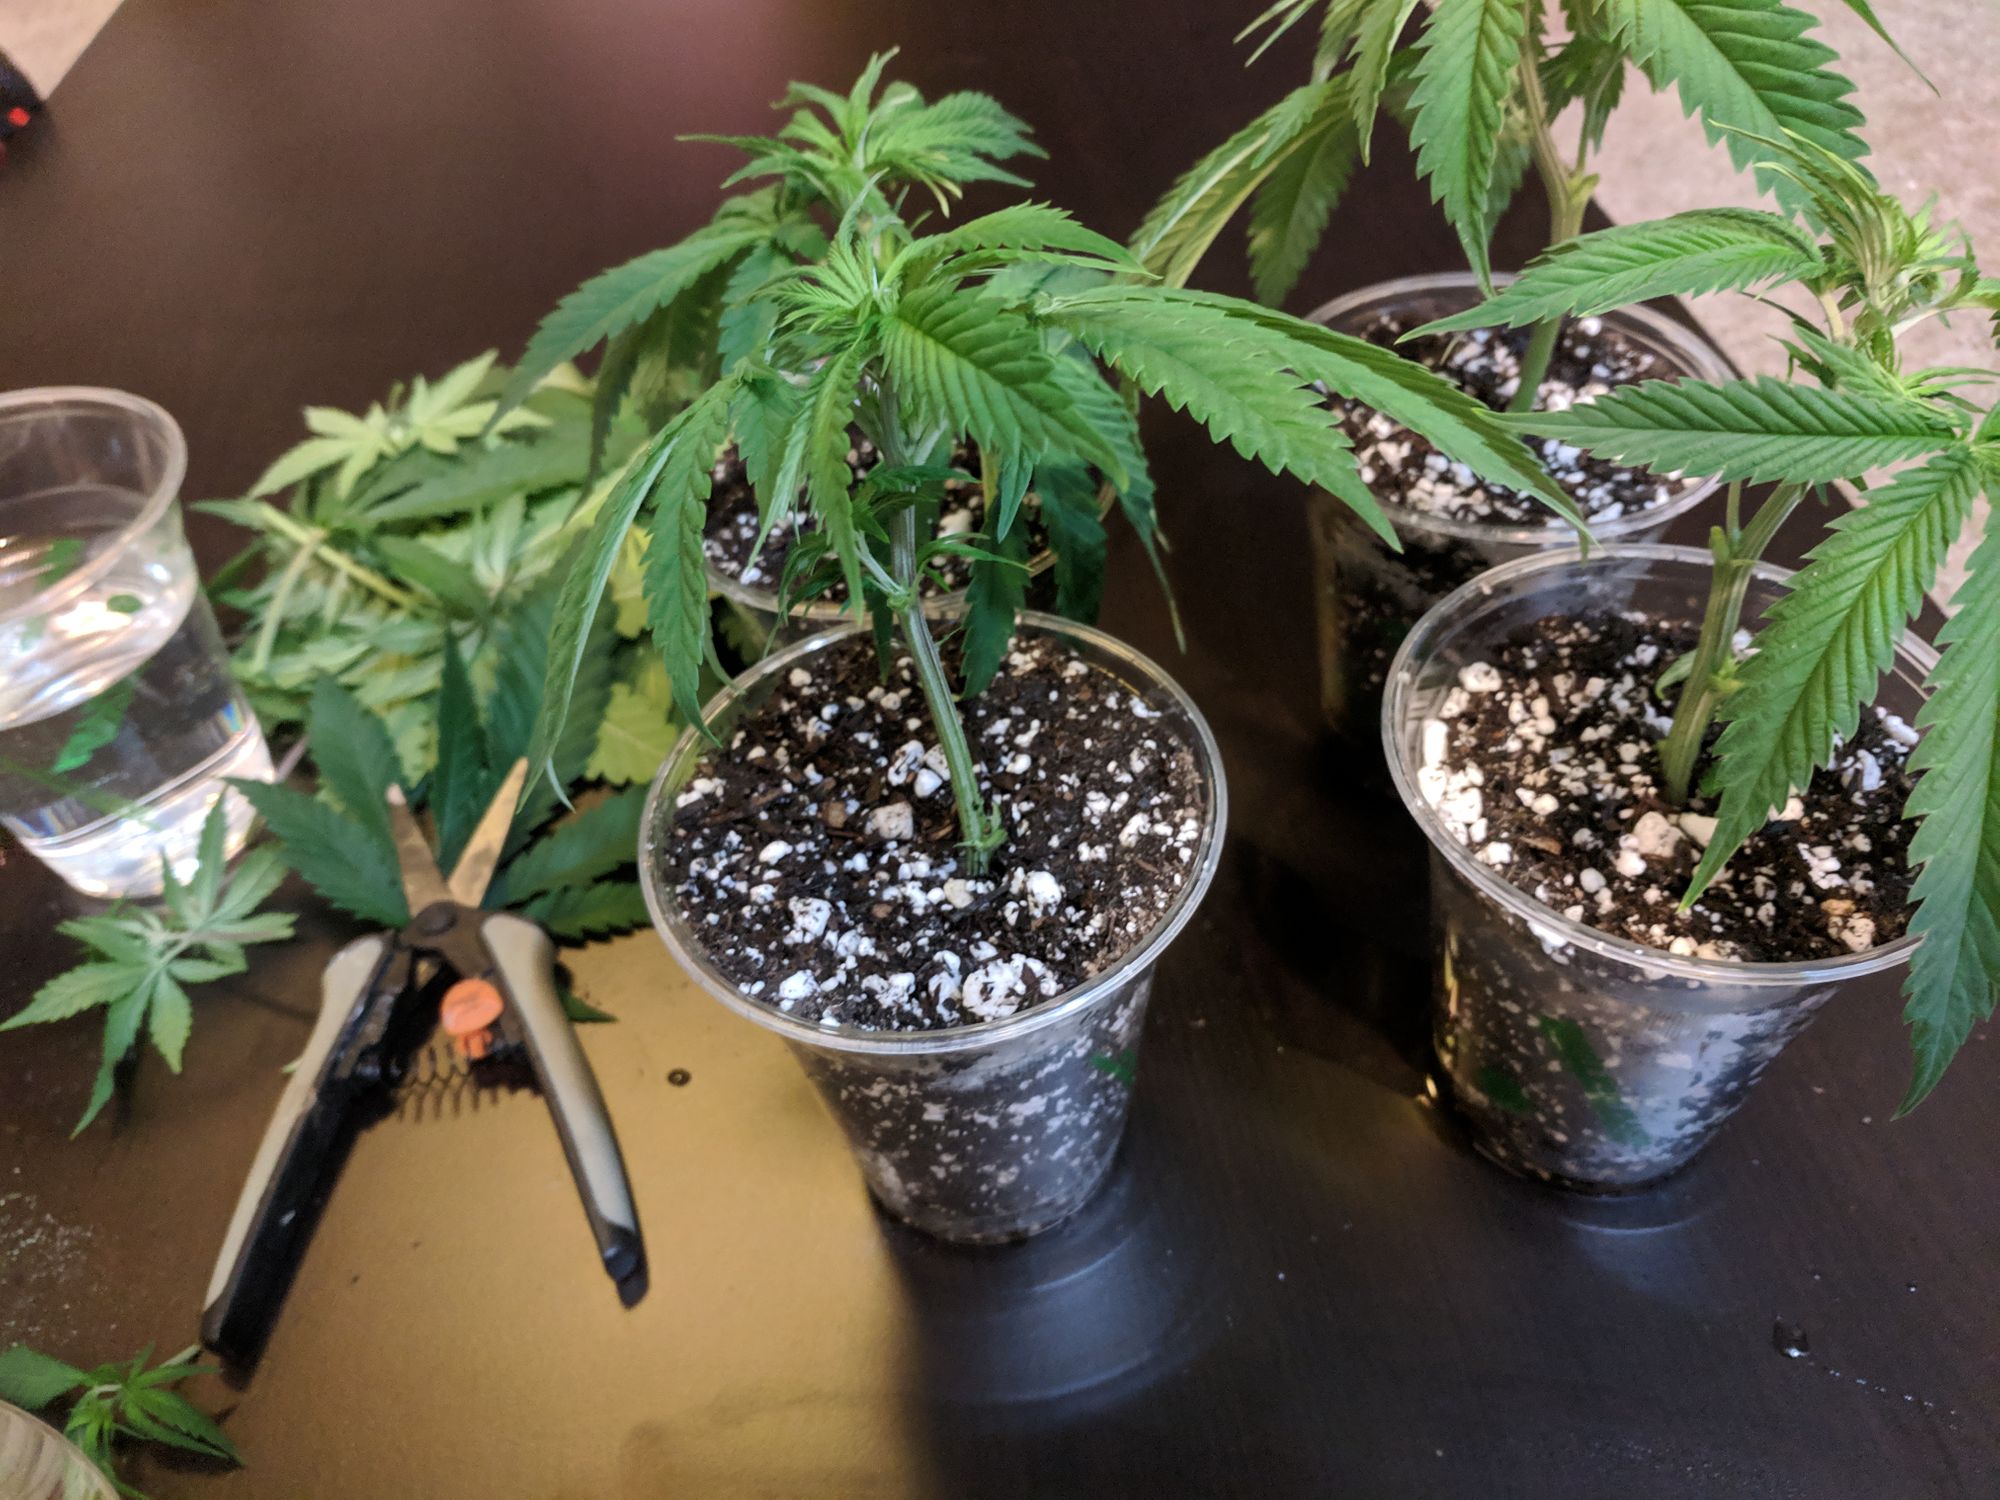
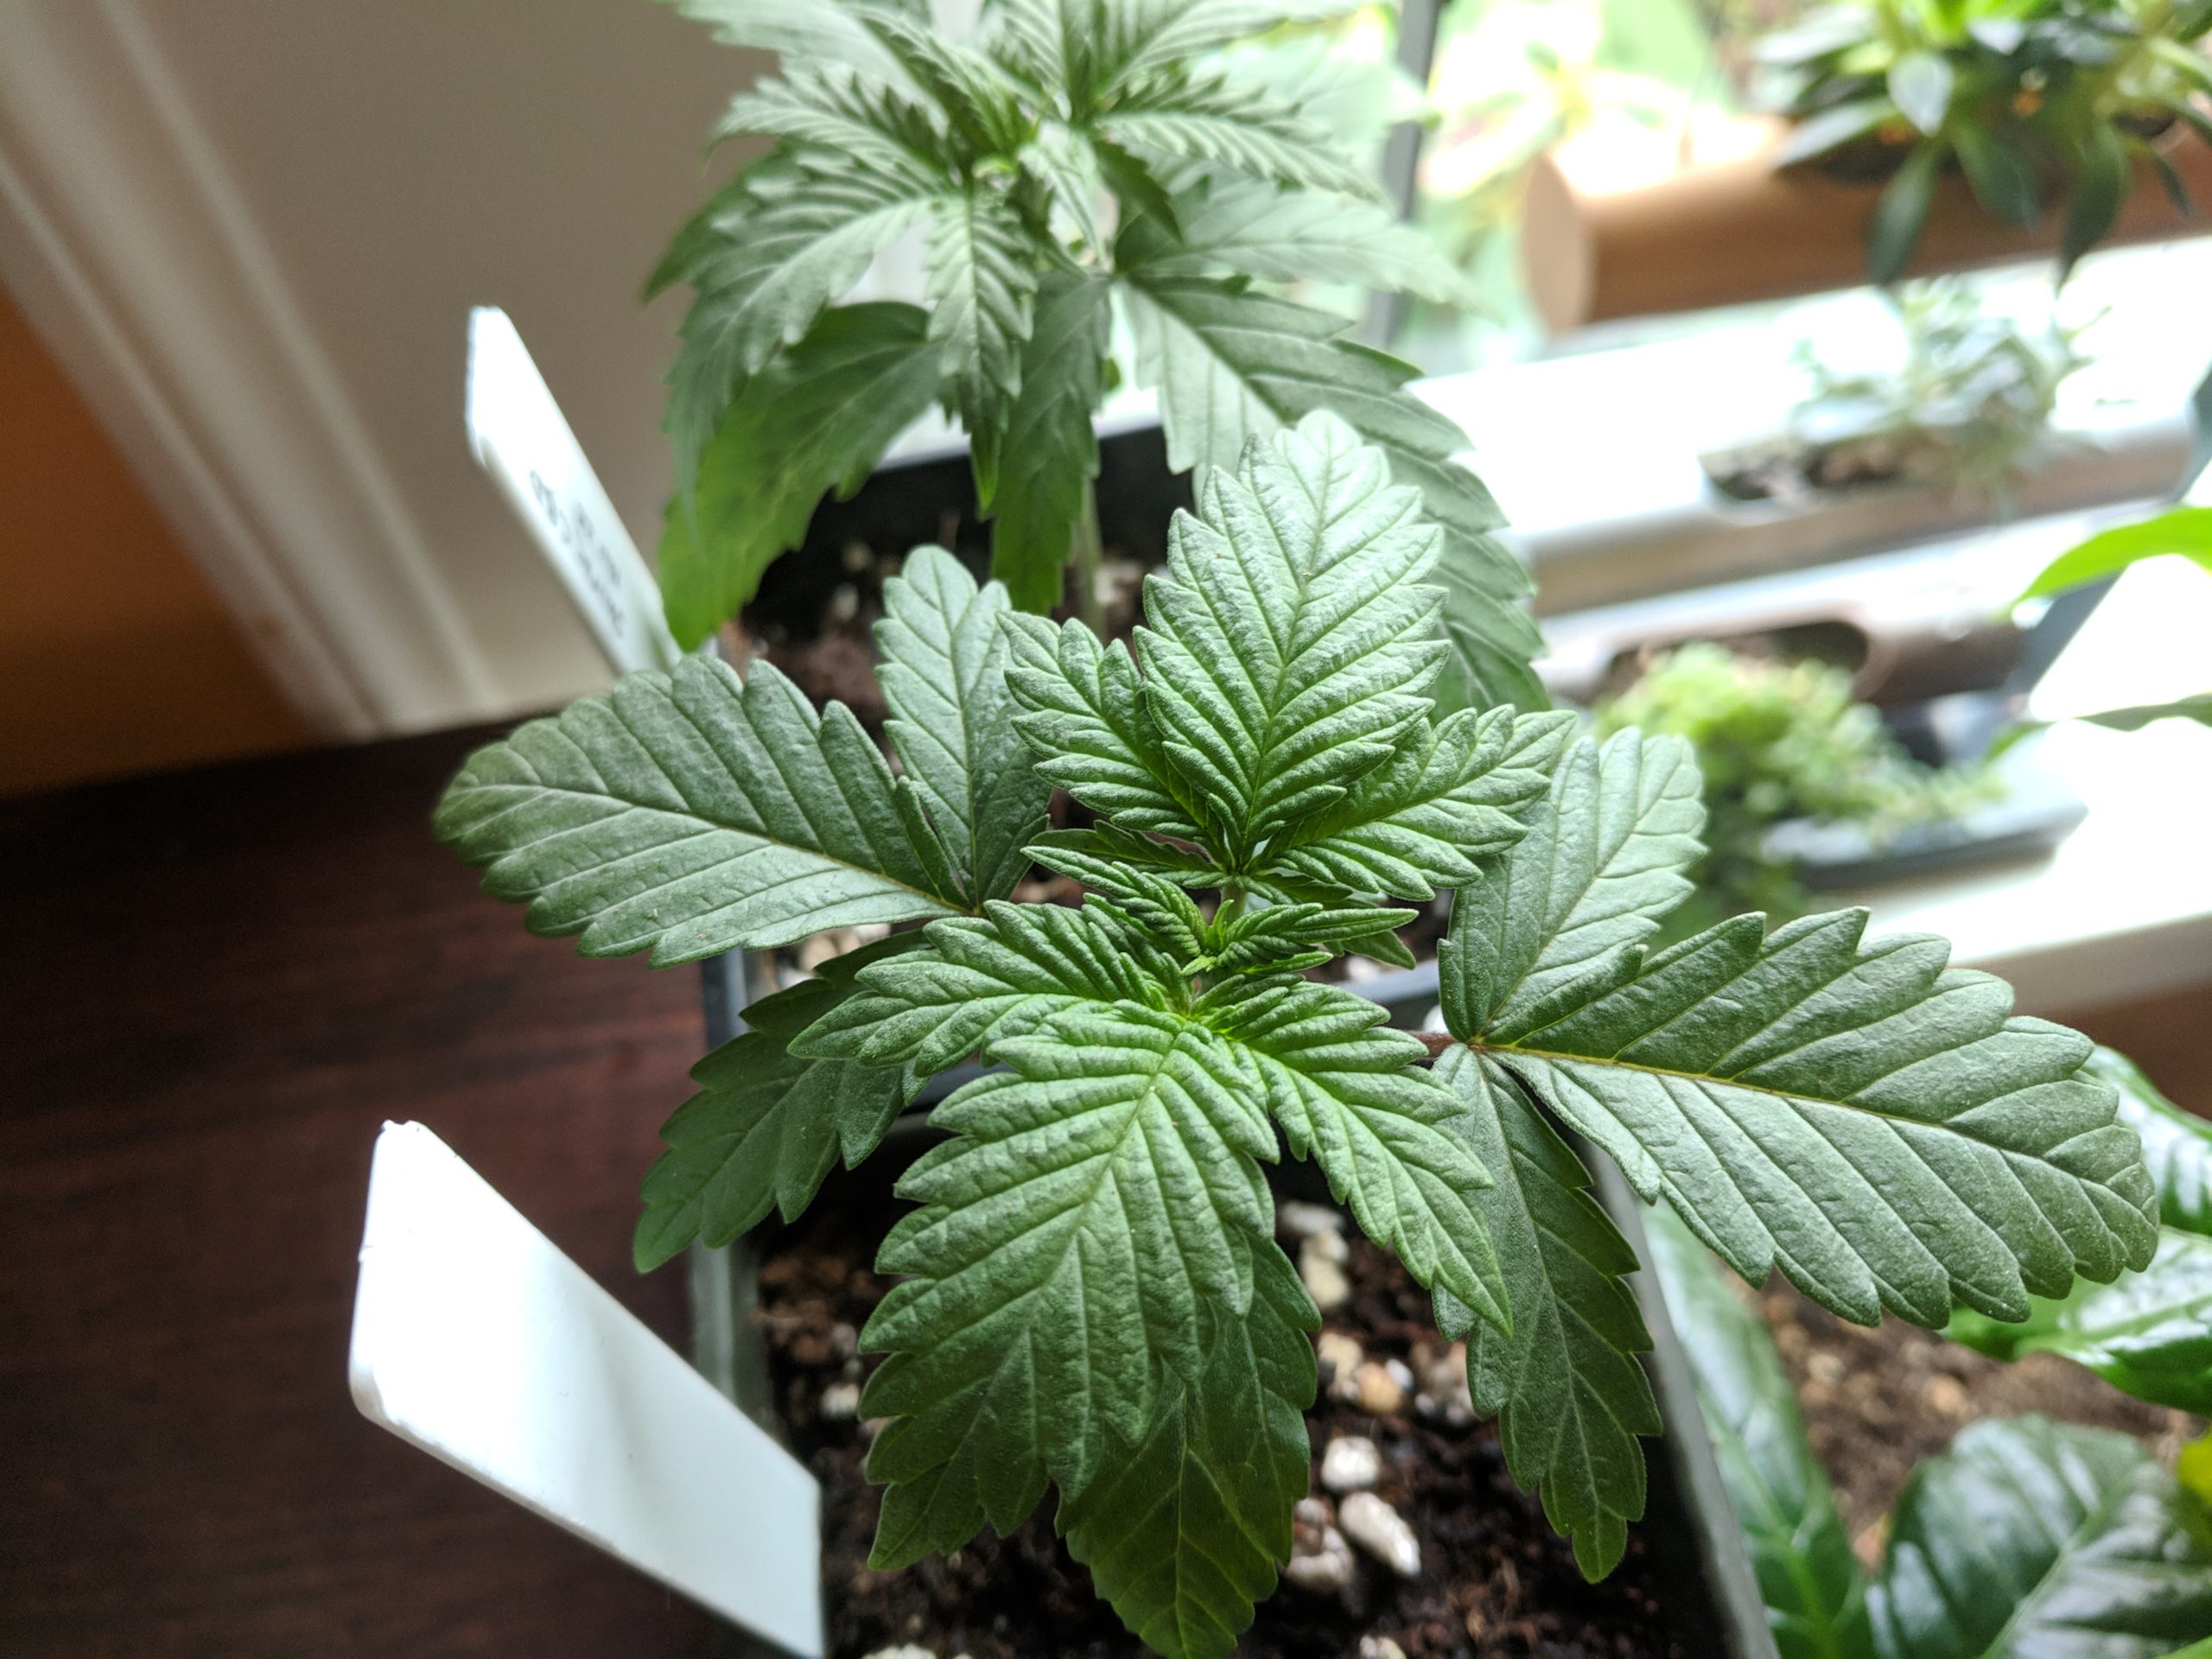
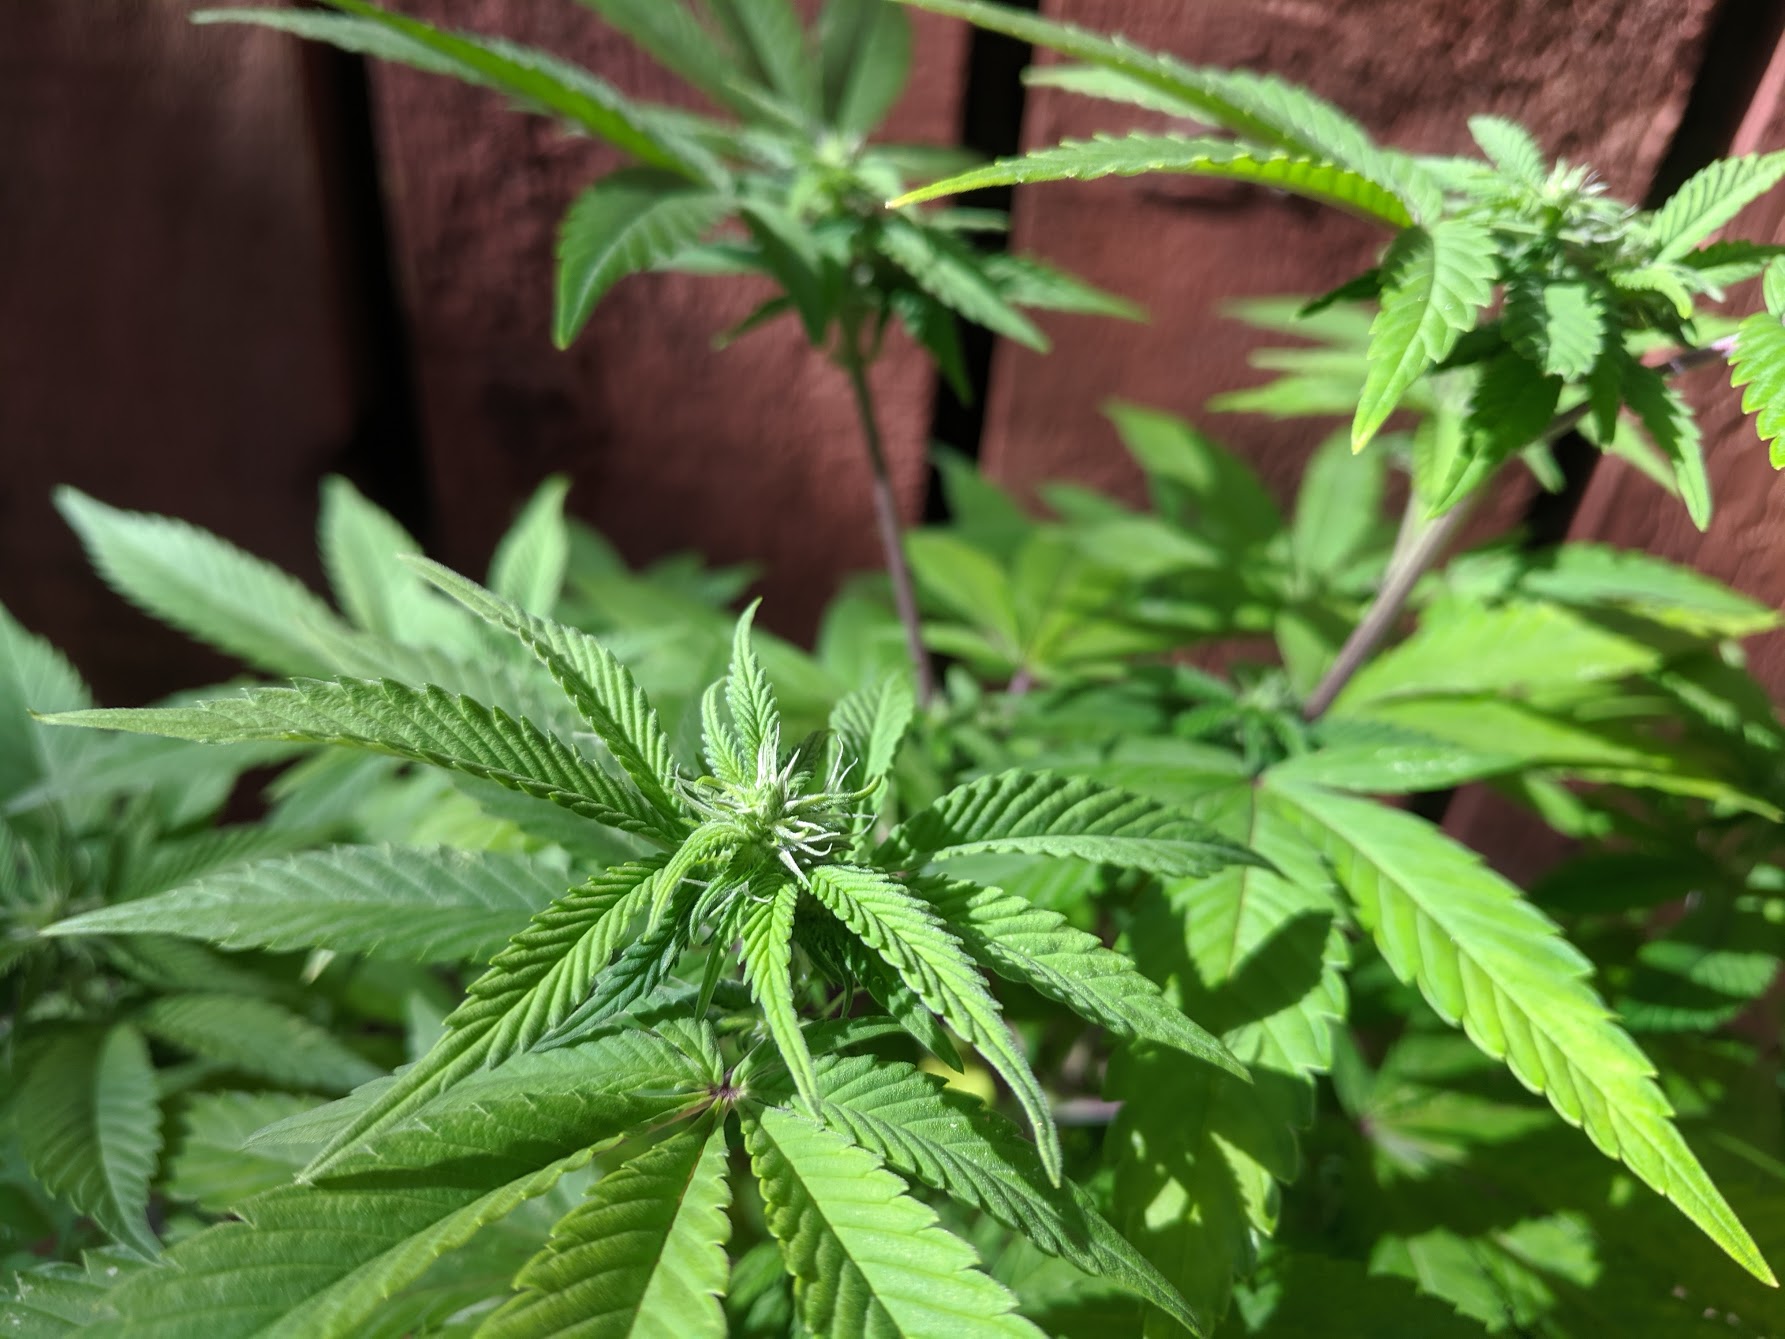
Acapulco Gold are vigorous growers in all stages – these two girls in vegetative growth stretched so fast they had to be hard cut back to even them out.
During vegetation, the plant grows vigorously. This is the right time to perform topping and training so the plant doesn’t stretch too much when put into flower. During flower, the lanky stems can start to droop with the weight of the colas, so they might need to be tied up or otherwise secured so they don’t break off. This might sound like a lot of work, but overweight buds isn’t the worst problem to have!
These plants grow fairly large colas on thin, lanky branches, so they can benefit from the spread and extra support from a SCROG setup.
We found this strain particularly suited to screen-of-green, since the lattice will provide the support that the buds need in later stages.
Speed to Flower?
For an old-school Sativa strain, 60 to 70 days isn’t bad.
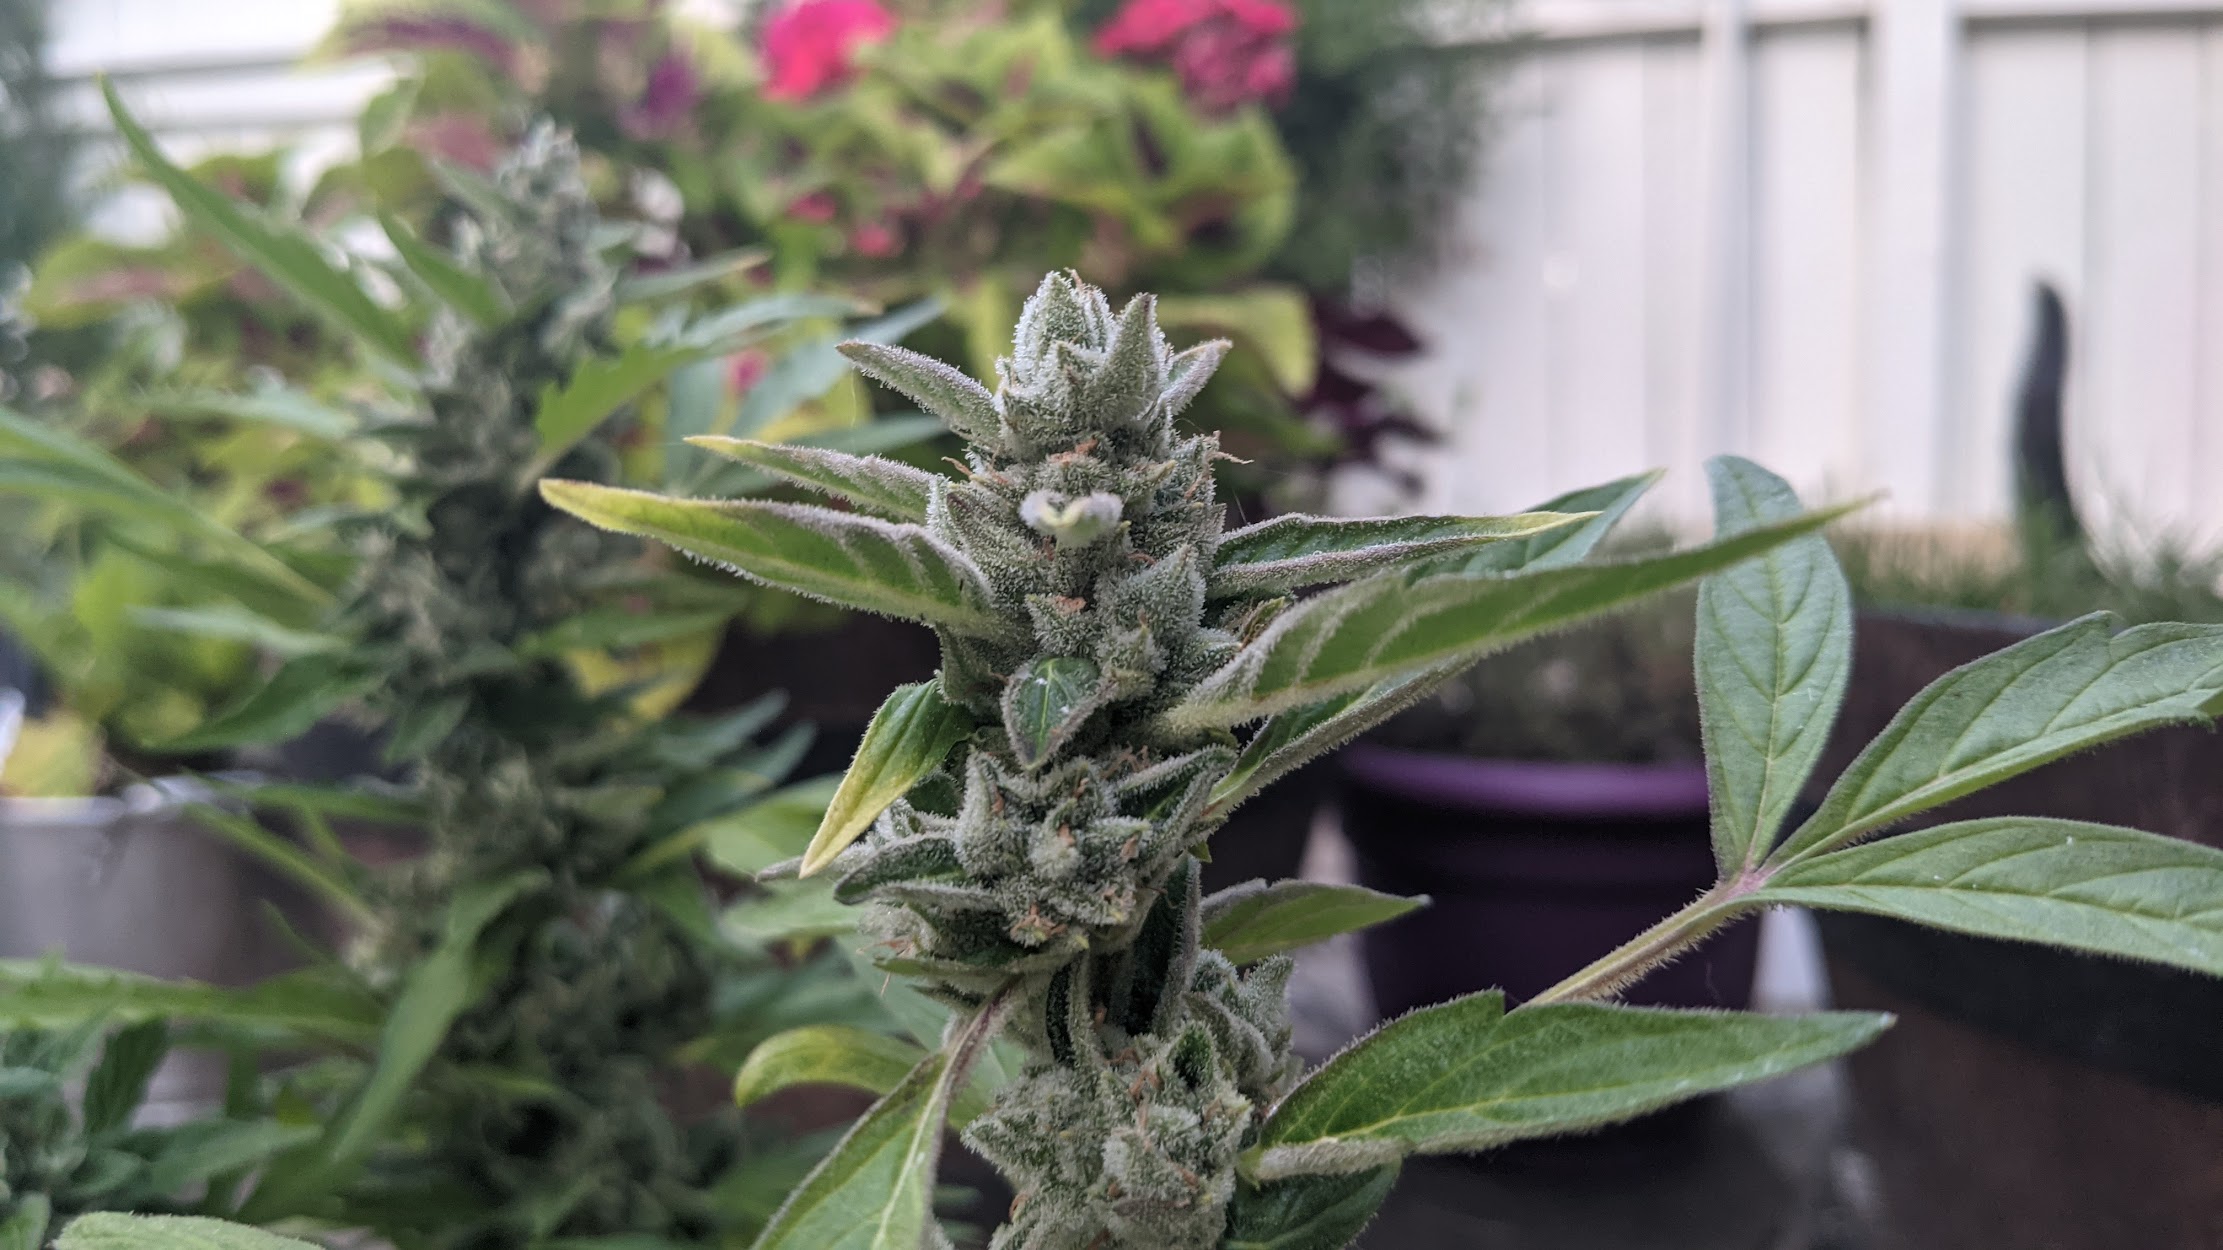
Resin begins forming early in the flower stage and ends up coating the surrounding leaves.
Medical Use?
Acapulco Gold has been celebrated since the 60’s for its energizing and euphoric cerebral effects, making the strain useful in treating anxiety, depression, stress and even pain.
Let’s face it, this strain has been a part of our popular culture for so long and has had such an impact because it has an actual physical and mental impact on it’s users. Linguist Jean-Charles Seigneuret said it played a role as a “psychedelic Philosopher’s Stone” and could “transform the metaphorical lead of the harried, detribalized modern conscience into the ‘gold’ latent in ‘Acapulco gold.'”
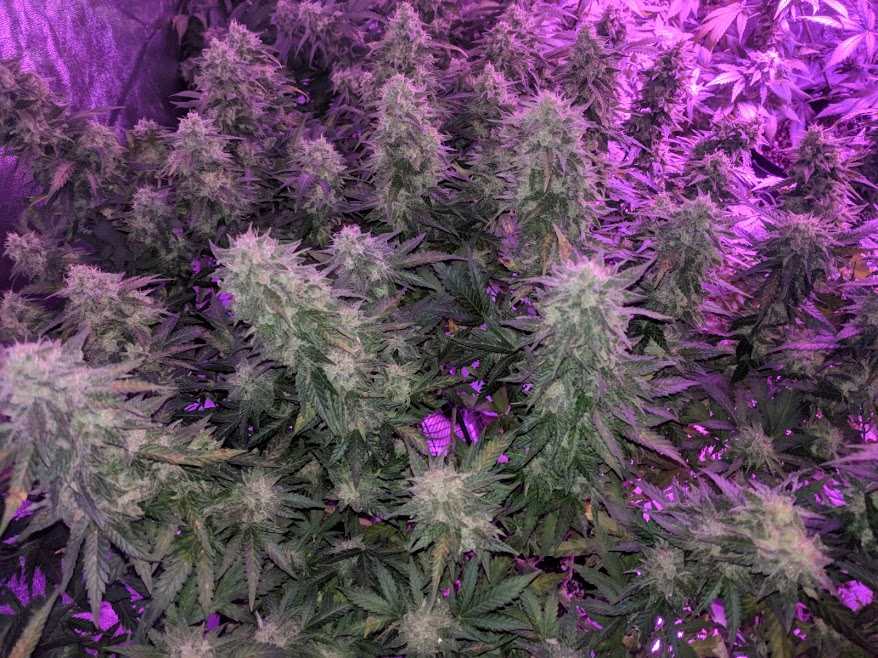
Acapulco Gold flowers are covered in red hairs and lots of resin.
Potency
This plant is has medium to high levels of THC, with most test clocking in between 18 and 24% with low levels (<1%) CBD.
Yield?
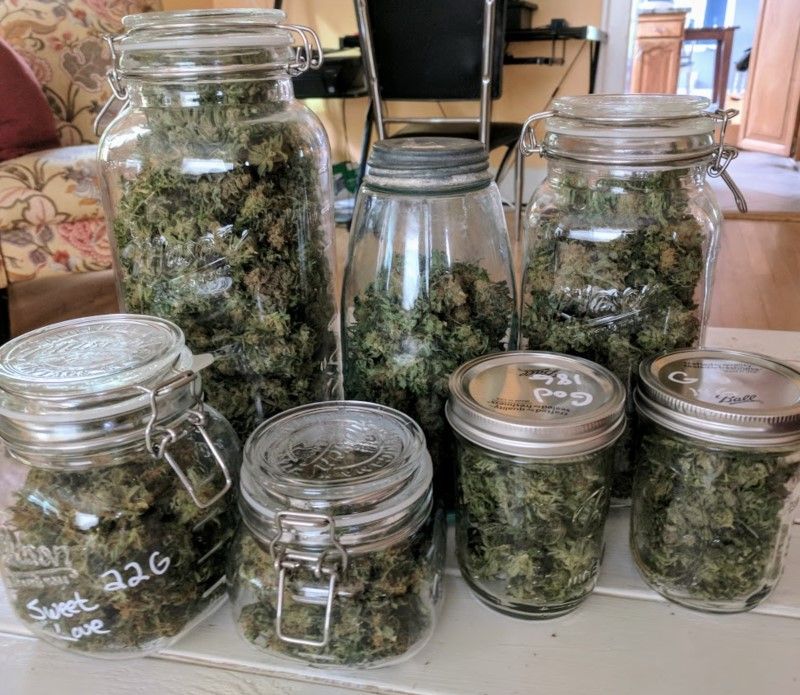
The advertised yield is high at 1500 grams per plant outdoors and up to 500 grams per square meter indoors. In part because it is so adaptable to training and nets, we’ve come close to these indoor numbers with each grow. With large buds that are densely packed, this strain has proven to be one of the highest and most consistent producers in our tents.
Taste
The tastes and smell profiles of this plant can vary from citrus to woody, but one consistent profile we noticed is an overarching pine smell and taste. The smoke is smooth and rich.
Summary
This is one of our favorite strains for indoor growing and if you are up for a little topping and training, you’ll find it to be a top producer too.
About Barney’s Farm
Started in the early 90’s, Barney’s Farm has become one of the most prominent breeders in the world. Over the last decade, Barney’s Farm have produced some of the world’s most popular varieties of cannabis, Winning the Cannabis Cup and Indica/Sativa Cups with G13 Haze, Liberty Haze, Amnesia Haze, Willie Nelson, Cookies Kush, Pineapple Chunk, Tangerine Dream and Critical Kush becoming a bestseller within months of release.
In this guide, we’ll walk through the cannabis life cycle. When thinking about growing cannabis, it’s important to understand three basic facts:
Fact 1: Cannabis is an annual plant
Marijuana is known as an ‘annual’ because its entire lifecycle occurs within a year. When grown outdoors, seeds, which have lain dormant through winter, germinate and grow into seedlings in spring; vegetate and mature throughout summer; in fall they flower, producing and pollinating seeds; before dying by winter. The next year, it all begins again.
Fact 2: Cannabis is a dioecious plant
To be dioecious means that each plant (almost) always has only either male or female reproductive organs. Each plant is explicitly male or female. This is important because when growing cannabis for consumption, you want to select only flowers of female plants not pollinated by males; pollinated flowers produce seeds, which drastically reduce potency and flower yield.
Fact 3: Flowering can start either through photoperiodism or automatically.
Most standard strains of cannabis are known as ‘photoperiod,’ because flowering is induced by altering lengths of exposure to light. While nights (periods of darkness) are shorter than 12 hours, cannabis will continue vegetative growth. Once nights are longer than 12 hours, they will begin to develop flowers. Outdoors, this happens in the lengthening nights/shorter days of fall. Indoors, we can choose when this happens by manipulating light and dark hours.
There is another kind of cannabis plant, though, that is ‘auto-flowering’; flowering begins a predetermined amount of time after germination, regardless of exposure to light. The amount of time before flowering varies, based on the individual strain. Every modern strain was bred from a single small hemp plant known as Cannabis Ruderalis, which had the auto-flowering trait, but didn’t produce much THC. Over the years, it has been cross-bred with Cannabis Indica and Cannabis Sativa to raise THC levels. While auto-flowering strains are generally less potent and productive compared to their photoperiod counterparts, the convenience of not worrying about light control makes them a great option in many situations.
Cannabis has three primary states: 1) seedling 2) vegging and 3) flowering
1) Seedling Phase
The seedling phase begins when the young plant first emerges from the seed and extends for the first few weeks of life. Seedlings are born with a pair of small round leaves, called embryonic cotyledons, that formed in the seed. The young seedling uses these leaves to bootstrap photosynthesis and growth processes. In the next days, it will begin building its first true leaves. The initial sets will have a single point, the next three, before finally developing the five- and seven-point leaves that we associate with adult cannabis plants.
The primary objective of the seedling phase it to allow the plant to develop hearty leaves for photosynthesis, healthy roots to slurp water and nutrients, and a sturdy stem to support the plant. It’s best to let the seedling do its job with minimal interference from the grower.
Seedling Care
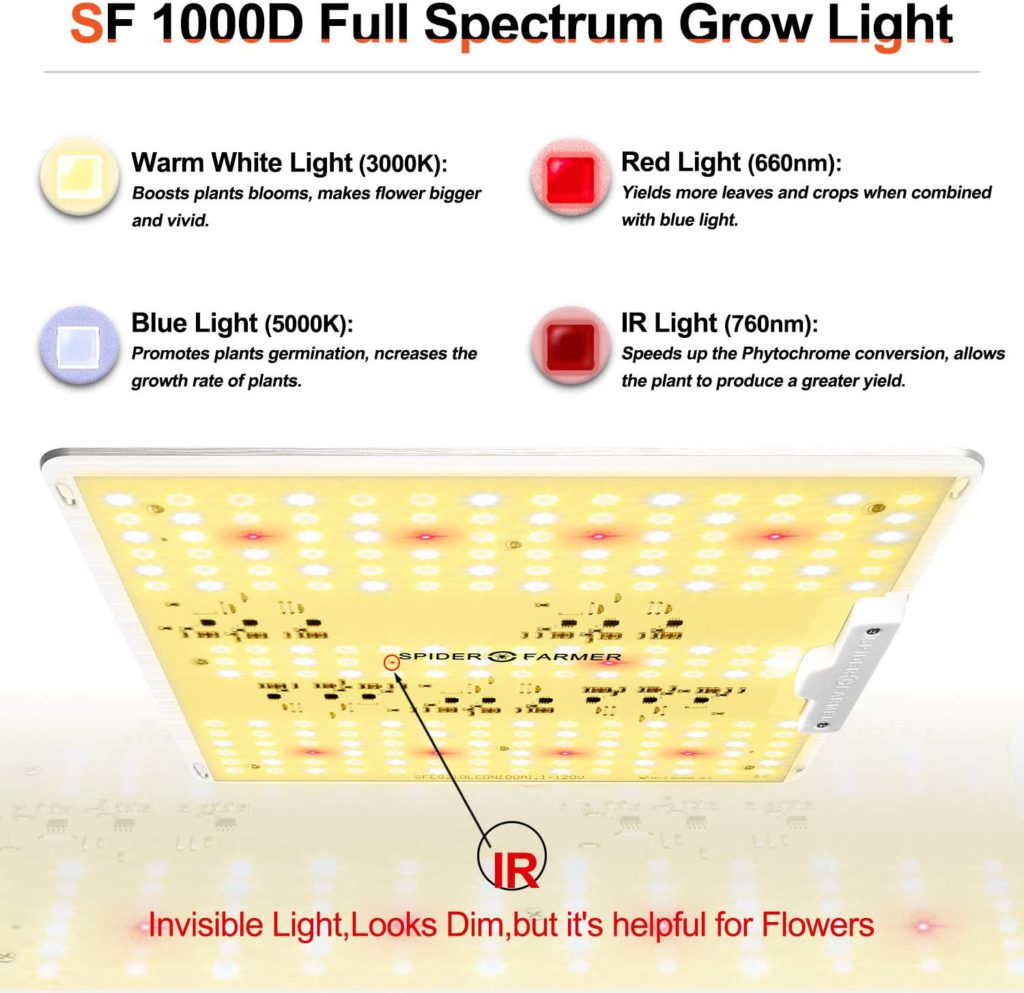
Lights
Provide ample light, though not too bright, for over 12 hours each day. Compact fluorescent light, low powered LED, or a window sill will do fine. There are indications that 24 hours of light per day can harm the vascular systems of young cannabis plants, so we recommend between 16 and 18 hours of light per day while for seedlings. Learn more about lighting options and schedules here.
Temperature/Humidity
During the seedling stage, we are trying to replicate warm spring conditions – ideal temperatures are between 70° and 80°F, and should never drop below 60°F. Seedlings benefit from higher air humidities while root structures are forming, 60-70% being ideal.
Water/Nutrients
Water should have a pH level balanced between 5.5 and 6.5. Watering seedlings are simple if you follow these two basic rules:
DO keep the soil warm and moist throughout the seedling phase. DO NOT flood or over-saturate the soil (no sitting water), as this will prevent the roots from getting enough oxygen, and block access to nutrients. Too much water and the seedling will ‘damp out’ and fail.
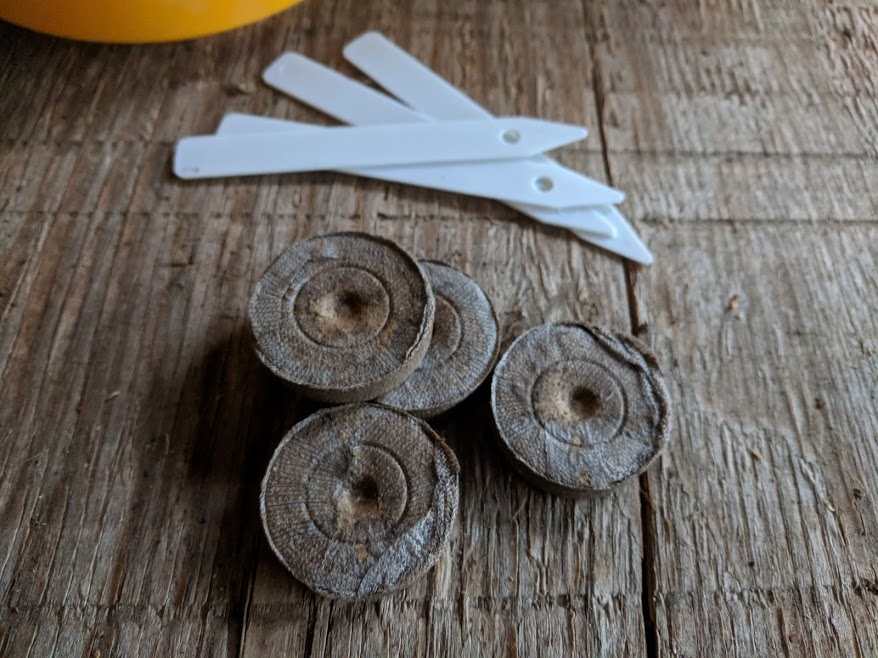
Young seedlings get all the nutrients they need from water and light, and excessively high levels of nutrients in the soil will ‘burn’ their leaves. Peat plugs have almost no nutrient content, making them ideal mediums for young seedlings. Learn more about watering and nutrients here.
Transplanting
The best practice is to keep plants in containers suitable to their size. If the container is too big for the plant to use all the water, they tend to damp out from oxygen deprivation. If the container is too small, the plant can become ‘root-bound’ and cease growing. Start off with small containers for small plants, and transplant to bigger ones as they grow. Learn more about containers and transplanting here.
Training & Pruning
Young seedlings are tender, and under rapid development, and so shouldn’t be trained or pruned at this stage. Droopy seedlings can be propped up with a stake.
2) Vegetative Phase
The vegetative phase begins when the young cannabis plant starts producing five- and seven-point leaves. At this point, the young plant will need to start consuming large quantities of water, light, and other nutrients, as they enter this stage of rapid growth.
The primary objective during the vegetative phase is to create as many bud sites and as much plant mass as possible while training the plant into the final growth shape before flowering begins. We do this through training, topping and selective pruning. Cannabis plants in the vegetative stage are incredibly robust and quickly regenerate from injuries, pests, and nutrient deficiencies. Once a plant enters the flowering stage, it becomes much less resilient and pliable, so use the vegetative stage to position your plant, so to make the most out of flowering.
Vegetative Care
Lights
Provide ample bright lights for over 12 hours per day. High powered LEDs or HPS are recommended for the most productive grows. Learn more about lighting options and schedules here.
Temperature/Humidity
During the vegetative stage, we are trying to replicate summer conditions. Ideal temperatures are between 70° and 85°F (21°C-30°C) and should not go above 90°F (32°C) or below 60°F (15°C). Vegetating plants need less humidity than seedlings since their mature roots can pull ample moisture from the soil. Increased humidity increases the risk of mold, rot, and pests, so keep the relative humidity around 50%. For optimal conditions, start vegging at 60%, and lower to 45-50% through vegetation.
Water/Nutrients
For watering, vegetating plants follow the same rule as all other phases:
DO keep the soil warm and moist throughout the vegetation phase. DO NOT flood or over-saturate the soil, since this will prevent the roots from getting enough oxygen, and cause other nutrient deficiencies.
A good rule of thumb is to wait until the top two inches of medium (knuckle deep) is dry before watering again. Another method is to gauge from the weight of the plant. If you see the leaves start wilting, you’ve waited too long. Have no fear though, young cannabis plants are amazingly strong and resilient, and will most likely bounce back!
Vegetating plants use macronutrients for basic building blocks in its rapid growth process. During the vegetative phase, nitrogen is essential, and potassium less so – though those roles reverse during flowering. Vegetating plants also need micronutrients, like iron, calcium, and zinc, but too many micronutrients can block access to macronutrients. Most nutrients are only available to the plant at specific pH ranges. Using balanced, multi-faceted nutrient systems are the best mechanism to ensure your plants get everything they need. Learn more about watering and nutrients here
Transplanting
Make sure to transplant vegging plants as they outgrow their current container, and that they are in their final container before starting to flower. Learn more about containers and transplanting here.
Training & Pruning
Vegetating cannabis grows rapidly; we call it weed for a reason! Since our primary objective in the vegetative state is to get into the desired shape, we use a variety of techniques available to manipulate vegetating plants, including training, topping, cutting and breaking. Learn about topping here.
3) Flowering Phase
The flowering phase is where the plant produces sex organs. Females will produce the flowers we know as buds. Males will produce pollen sacs, in bunches that look like grapes.
The primary objective during the flowering phase is to grow large, healthy buds. Almost all shaping and manipulation happens during the vegetative stage. During the flowering stage, the stems will become woody and rigid. Flowering plants do not recover from pests, deficiencies, and other accidents so quickly, so you treat your plants with care while they are flowering.
Flowering Care
Lights
Provide ample bright light for less than 12 hours per day. Photoperiod plants require at least 12 hours of uninterrupted darkness per day to flower. If the darkness is interrupted often, the plant will leave the flowering state, and revert to vegetating. High powered LEDs or HPS are recommended for the most productive grow. Learn more about lighting options an schedules here.
Temperature/Humidity
With flowering plants, we are trying to replicate late summer and fall conditions. Ideal temperatures are between 70° and 85°F (21°C-30°C), and should not go above 90°F (32°C) or below 60°F (15°C). Flowering plants need less humidity than in the seedling or vegetative stages. Increased humidity runs the risk of mold, rot, and pests, so keep the relative humidity around 40-45%.
Water/Nutrients
For watering, flowering plants follow the same rule as all other phases:
DO keep the soil warm and moist throughout the vegetation phase. DO NOT flood or over-saturate the soil, since this will prevent the roots from getting access to enough oxygen, and cause nutrient-deficiencies.
Note: flowering plants are not as resistant to over- and under-watering as vegetating plants.
Flowering plants also need macro- and micronutrients, and it is essential to keep these levels balanced. Unlike the vegetation phase, plants in flower do not require as much nitrogen (too much can slow production) but need increased potassium. Using balanced, multi-faceted nutrient systems will still be the best mechanism to ensure your plants get what they need. Learn more about watering and nutrients here
Transplanting
Cannabis plants should not be transplanted in flower if it can be avoided. Since transplanting is incredibly stressful, you should make every effort to have the plant in its final container before starting flower. If transplanting cannot be avoided, use extreme care in transplanting to minimize stress and damage.
Training & Pruning
Vegetating cannabis grows rapidly, and is extremely resilient to both high and low-stress training. This is NOT the case for flowering plants and you should not cut, injure or perform any other high-stress activity on your flowering plant. After a few weeks of flowering, the plant will become rigid, and vertical growth will slow – at which point even LST techniques should no longer be used.
Prune your flowering plants selectively. I remove small bud sites from the understory to focus growth on the big buds up top. You can also pull fan leaves that are damaged or excess fan leaves for additional airflow. Always be gentle with your flowering plant, and never take too much at one time.
Life Cycle FAQs
How long does it take to raise a cannabis plant from start to finish?
For photoperiod plants, the amount of time will vary based on how long you keep it in vegetation before you switch to flower. Since you can induce flowering immediately after seedling (3 weeks old), and most strains take at least eight weeks in flower, 10 to 11 weeks is the minimum possible. The longer you leave the plant in veg, the larger the flowering plant will be.
Vegging your plant for 1 to 2 months will drastically improve yields.
This may be our entry-level tent grow kit, but it has enough power to produce heavy yields of top-shelf bud. For under $250 USD, the starter tent kit can net 300 to 500 grams per square meter (1 to 1.7 ounces per square foot), depending on the strain you choose.
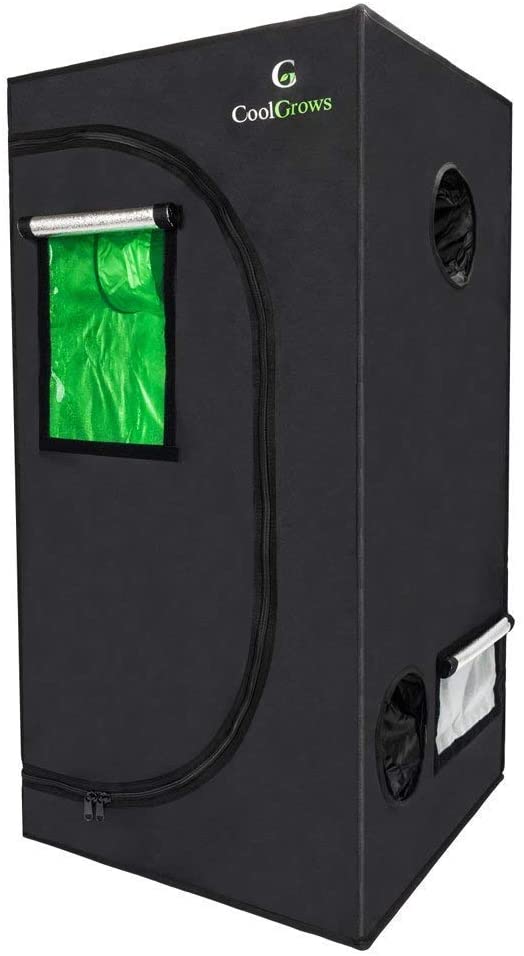
Tent – Starting under $90 USD
Grow tents are specially made ‘tents’ with canvas on the outside and a mylar coating on the inside to reflect light back on the plants. Bars on the ceiling structure make it easy to hang lights. Ventilation openings provide airflow control. Tents have a blackout zipper to seal the door and vents can be velcroed, or cinched shut for complete ‘black out’ light control. This is our favorite tent for small grows.
This 2×4 tent is great for micro-grows because it has durable metal connectors a viewing window and good ventilation.
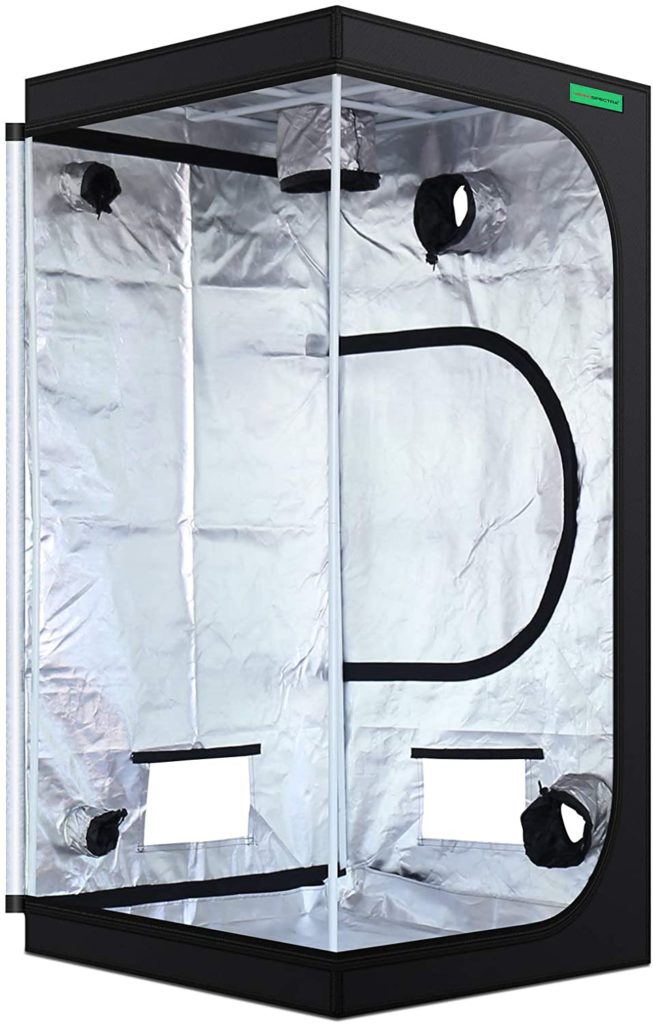
OR for $90
This 3×3 tent from Vipaspectra is perfect for small grows because it has lots of ventilation and is made from quality parts. We use these tents extensively.
Light – Under $90 USD
For growing in compact spaces, you need a light that doesn’t burn hot. LEDs are very efficient so they make a great choice for keeping heat and costs down. These are our favorite lights for small grows.
We have several of these fanless LEDs from Spider Farmer and love them because they are silent, burn cool, and work great in small tents.
Ventilation – Under $20 USD
Without good ventilation, the air in your grow space will become very humid and hot and lead to mold, disease and stress. A good grow space is well ventilated to make it easy to exchange fresh air. We use these small fans because they are very quiet and move a fair amount of air.
Nutrients – Under $30 USD
Cannabis plants need macronutrients for basic building blocks in their rapid growth process. During the vegetation phase, nitrogen is very important and potassium is less important – though those roles reverse during flowering. Marijuana plants need micronutrients too, like iron, calcium, magnesium, and zinc. Read our water and nutrient guide to get the details.
pH Balance Kit – Under $10
You will want to test the pH every time you water to make sure the soil stays in the right pH range. Cannabis likes pH between 5.5 and 7 depending on the strain. See our Water and Nutrient guide to learn more about managing pH.
Soil – Under $15
Cannabis does best if the soil drains excess water well, but doesn’t dry out too quickly. It should also be light and airy enough – compacted soil will stunt root growth. Check out our soil mix guide for more details.
Container – Under $10
Cloth or fabric grow bags, also known as Smart Pots, are exactly what they sound like: cloth bags made for growing. They come in a variety of sizes, from 1 quart (~1 liter) up to 50+ gallons. Made from soft fabric that is easily air and water-permeable, they have excellent drainage. But the best part is that even overgrown plants won’t become rootbound due to ‘air-shearing’. Air-shearing is the process where roots shear off when they reach the air spaces at the edges of the bag, preventing them from becoming bound as they search for new soil. Read more about selecting the right containers in our container and transplanting guide.
Seed – Starting at $20 (including delivery)
Here are two great options for seed. The first is a photoperiod feminized seed that will produce heavier yields but requires your space have good light control for flowering. The second is an auto-flowering strain with great medicinal properties, and since it’s auto-flowering, light control isn’t an issue. Read more about cannabis strains and seeds here.
You have a couple of options with this setup. This setup will work for growing 4 plants if you put them into flower right away in a process known as 12/12 from seed. The most economical option is to grow one plant and use low-stress training to topping make the most use of your space. Learn how to do this in our low-stress training guide.
Total: Under $250 USD
This is a startup cost. Soil is an ongoing cost, but nutrients will last for several grows and the lights will last for over 50k hours.
What can I grow with this setup?
This setup has coverage of around 4 square feet (~.4 sqare meters). The Northern Lights from 00 seeds below was grown with this setup and netted almost 100 grams (3.5 OZ) of high-quality bud in a little over 3 months from seed!
How can I grow more?
Simple answer: more lights and more space. Check out our lighting guide for some ideas.
First formulated in 1976, Flora Series is the original three-part hydroponic-based nutrient system. We’ve spent 6 months using the Flora Series so that we could review it for you, and here’s what we found:
General Hydroponics Flora Series
7.3 out of 10
Flora Series consists of three highly concentrated liquid nutrients – by using in different combinations, you can satisfy each plant’s exact nutrient needs for every growth stage and environment. Overall, it is easy to use and is low cost but is not the highest performance product on the market.
Ease of Use
8 out of 10
Price
9 out of 10
Performance
7 out of 10
Sustainable/Healthy
5 out of 10
Pros
Fairly Easy to use
Low price
Cons
Not Highest Performance
Leaves salt residue
Today we’re going to review one of the most widely used cannabis nutrient series in history: General Hydroponic’s Flora Series. A 3 part nutrient system, the Flora system advertises itself as suitable for all growing mediums.
About GH Flora Series
GH Flora series isn’t a new kid on the block, it’s been tried and tested for over 40 years! First formulated in 1976, Flora Series is the original three-part hydroponic-based nutrient system.
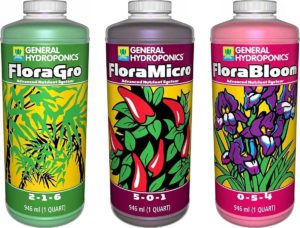
Flora Series consists of three highly concentrated liquid nutrients – by using in different combinations, you can satisfy each plant’s exact nutrient needs for every growth stage and environment.
FloraGro builds strong roots during a plant’s vegetative stage.
FloraMicro is used during a plant’s growth and bloom cycles.
FloraBloom is added while a plant is fruiting and/or flowering.
Easy to Use?
Over the past 40 years, they’ve managed to work most of the kinks out of this product. The bottles are basic and serve their function, but actually have a couple of plus-ups over some other brands:
Every bottle has the feeding schedule for all 3 parts clearly printed on the back, which is very convenient at feeding time.
The designs on the bottle are unique and so are the colors of the liquid. This make it easy to tell the three apart, which is helpful to keep your measurements straight.
The containers don’t always pour out as cleanly as I would like and would benefit from a clean pouring spout – but this is a tiny issue overall.
For pH balance, I found the Flora series lowers the pH of my water more than I want it to. Starting with water pH measuring 6.8, I tended to measure closer to 5.2 after adding nutrients. Since I’m growing in coco, I prefer a pH over 5.5.
Cheap doesn’t always map one-to-one with value though. In this case, there are two detractors from the overall value: 1) you use quite a bit per feeding and 2) normal applications use more FloraBloom than the other two. In the first issue, this means that while you get a lot for a little, you use a lot each time compared to some other concentrated nutrients. On the second issue, this means that you will run out of FloraBloom earlier than the other two. If you plan to keep using this formula, this isn’t a problem because you can buy FloraBloom by the single bottle.
Performance
My statement on the performance I’ve seen from the GH Flora series is that it’s solid and commiserate with its cost. On the upside, it’s a gentle and easy-to-use solution that doesn’t seem to harm or burn plants easily. This makes it a great option for beginners and casual growers. More advanced growers on the other hand, will see better performance and value from a more modern formula.
Handling pests isn’t all about killing them but about managing them. All the plants you see in this article are survivors of significant pest outbreaks and have recovered. The secret isn’t to eradicate the pests, but to tilt the balance in favor of the plant.
When I first started growing weed from some bagseed I’d collected, I read everything I could find on home grows. After my first good crop, I must have been feeling my gravitas while in a conversation with a far more experienced grower when I said. “Well, it’s a good thing we don’t have any pest problems around here.” When he gave me a questioning look, I followed up with “You know, like mites and whiteflies and so on. It sounds horrible, so I’m glad we don’t have them around here.”
He laughed a little and then patiently explained that there probably isn’t a place in the world where you can grow pot that you don’t also grow pests. They go hand in hand. Why hadn’t I had problems in my grow? What I’ve learned since then is that it may take a little time for the pests to find a new grow space, but they will.
They found it on the very next grow and since that day, my grow rooms have been a constant battleground! My initial goal was total eradication; I wanted every bug gone, so I embarked on a useless journey that was doomed to fail.
Why can’t I eradicate all pests?
I’ve come to understand that creating an environment where cannabis can thrive but pests won’t is impossible, or at least impractical. It’s important to remember that the perfect humidity and temperatures for your cannabis plant are also perfect for unwanted pests and the plant provides them with all the food and water they need. Given that, you would either have to build an ideal clean-room, complete decontamination shower on entrance and sophisticated air filtration to keep the pests out.
The white spots on the leaf are the work of spider mites that hang out on the underside of the leaves.
Since clean room technology is out of most people’s reach, the next option is repeated spraying of pesticides. Organic pesticides do not kill all of the pests and any that claim to are not being honest. Chemical pesticides, on the other hand, are toxic enough to kill off an entire population, but all pesticides require continued applications to keep it free. Repeat use of chemical pesticides would have long-term impacts on the plant as it kills off beneficial organisms in the soil, to the environment at large and finally to you.
What can I do then?
After a time, I had to step back and evaluate my original objective. I don’t care about the pests in general; I only care about the pests that are causing me problems. Why didn’t I experience any issues on the first grow? I thought that it took the pests some time to find the closet – which had never been a food source for them before that. The fact is, they were probably there from the very beginning, they just hadn’t established a foothold large enough for me to identify them as a problem.
If they hadn’t been a problem before they established a foothold, I reasoned that keeping their numbers under that level would mean they were no longer a problem. What you’re looking for in pest control isn’t to eradicate the pest but control their populations, so they don’t negatively impact your negatively garden in either visual appearance or crop yield. To do this, you need to establish a balance in your grow space.
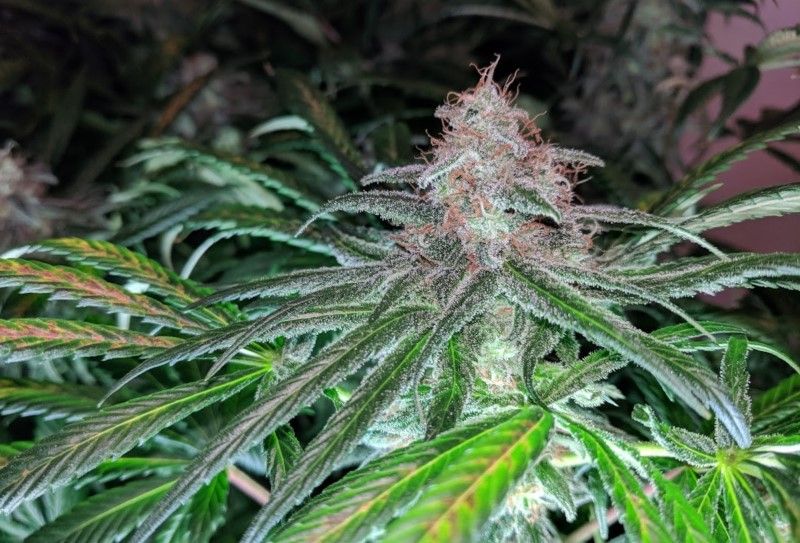
This plant had a spider mite outbreak when it first started flowering, but neem oil treatment quickly depleted the mite population.
It’s all about balance
Since growing beautiful and productive gardens is the end goal here, the benchmark I use to determine if a treatment is successful is simple:
A successful pest control strategy means never seeing the pests or signs that they’ve been there.
If it’s a given that pests will get into your space, our new thinking should be on how to prevent them from establishing a large enough population to impact the crop. With this new goal, safe and organic pest control approaches are suddenly viable again.
By combining a few simple strategies, we can efficiently manage pests, so that they aren’t a problem.
Organic solutions to an organic problem
If the goal of pest control in our grow spaces is to keep the pest population manageable, there are a variety of safe and natural approaches to get us there.
Step 1: Control the Environment
This step doesn’t require any chemical compounds at all; you need to follow a few simple rules in your grow space to keep the balance tilted towards your plant and not the pests:
Keep it clean; don’t leave litter, rotting leaves or standing water in your grow space since this provides excellent hiding spots and food sources.
Completely clean and disinfect the entire area in between grows, so you start your new grow with a clean slate.
Don’t spray the plants right before lights out; water droplets left on the leaves can encourage mold and mildew.
Keep proper temperature and humidity; too warm and humid and pests will thrive.
Good airflow and ventilation is the best way to keep the balance in your favor. Learn all about how to set up the right environment in our grow space guide.
Step 2: Use Neem Oil Regularly
Neem oil has been used in India for centuries and has become the de-facto treatment for organic farmers all over the world. Made by pressing the oil out of the seeds and fruits of the Neem tree, this stuff is a pure vegetable oil that has all the advantage of the tree’s natural pest resistance.
Neem oil can impact a wide variety of pests, over 400 different insect varieties as well as most fungus. The best part is, it protects against the neem tree’s natural enemies but doesn’t seem to harm more beneficial organisms!
Neem oil not only protects the plant from pests, it also leaves the leaves glossy.
Neem oil doesn’t directly kill pests, like most chemical-based pesticides. Instead, applying it creates a hostile environment for reproduction and depletes the population over time. The oil enters the insects and interferes with the insect’s reproductive system and the oily coating on the leaves impacts egg viability. The whole environment becomes toxic to the pests, and after a few generations of low birth rates, the population collapses.
Spraying your plant once a week is a great way to prevent pest populations from taking hold. If you have an active pest problem, you should spray once every few days until the problem is under control.
Whether its powdery mildew, whiteflies or mites, treat them aggressively at the first sign. I start off with a kill-on-contact solution, like NorCal’s 86 Mite & Mold treatment. This solution is made of a blend of essential oils and neem and kills most common pests on contact. After a few uses, I will switch back to a neem foliar spray but with increased frequency.
Once the pest population is back under control, scale back the neem applications to once every week or so.
Balance is key
There are lots of safe ways to control pests. Some farmers use ladybugs or predator mites to help. Remember, you’re trying to create a whole ecosystem in your grow space. For that, you have to take the good with the bad sometimes. If you keep that in mind as you look at solutions, it should be easy to tailor to your setup.
Grow, Micro & Bloom is a 3 part base nutrient system from Emerald Harvest that has been developed specifically for cannabis. We’ve done several trials with it and here’s what we found:
Emerald Harvest Professional 3 Part Nutrients
8 out of 10
Emerald Harvest Professional 3 part base nutrient is a combo pack made up of their Grow, Micro, Bloom fertilizer products. What sets this combo apart is that Emerald Harvest provides minimum dosage recommendations and encourages you to find the right blend for your setup.
Ease of Use
8 out of 10
Price
7 out of 10
Performance
9 out of 10
Pros
Easy to use
Great results
Quality Packaging
Cons
Not organic
Requires 3 Parts
Not the cheapest solution
The first thing that drew my attention to this base nutrient set was the philosophy of the company itself. Based out of Santa Rosa California, Emerald Harvest takes a farmer-centric view:
The idea of Emerald Harvest was the fruit of thousands of conversations with growers like you. You told us how devoted you are to your plants. We witnessed firsthand your knowledge and expertise. We learned you have needs that nutrient companies are not addressing.
What you want is an easy-to-use, high-quality nutrient brand offered at a reasonable price. That’s exactly what you get with Emerald Harvest.
Emerald Harvest Professional 3 part base nutrient is a combo pack made up of their Grow, Micro, Bloom fertilizer products. Whats sets this combo apart is that Emerald Harvest provides minimum dosage recommendation and encourages you to find the right blend for your setup. In addition to well buffered amounts of NPK, it also provides a rich mix of trace elements such as magnesium, cobalt & molybdenum as well as many chelated micronutrients such as copper, manganese, zinc & iron.
Easy to Use?
One of the best features is the easy-to-pour spout. It’s surprising how many companies don’t pay attention to the one feature you use the most – the pour spout. It’s just a hole, so I’m not sure why so many nutrients pour out like they have a built-in dribble glass feature, but Emerald Harvest gets it right here. Spills and drips are much less of a problem than with other brands.
On the downside, the feeding schedule is only printed on the Grow bottle. This is okay if that’s the first bottle you pick up, but a little annoying when it isn’t.
For pH balance, I found that Emerald Harvest 3 part works perfectly for me and I never need to adjust up or down. Starting with water pH measuring 6.8, I tended to measure between 5.7 and 6.0 after adding nutrients. This is perfect, since I’m growing in coco I use a pH between 5.5 and 6.6.
Good Value
Overall, this is one of the best values on the market. The purchase price is fair by market standards, starting at $45 USD for 1 liter sizes. While this is a little more expensive starting price than some other brands, but cheapest is not always the best value. The value here is that Emerald Harvest Professional 3 Part is highly concentrated, with the recommended doses about half of other brands. This makes it stretch longer, allowing the liter sized set to last for many grows.
Performance
I had high expectations for this product and the performance I’ve seen from Emerald Harvest Grow, Micro and Bloom nutrients have exceeded those expectations. I like the flexibility to tailor my mix and I love how the plants respond! Thicker stalks, greener leaves and fatter buds speak for themselves and have made this my new go-to nutrients.
This is our most basic grow kit, but it’s powerful enough to grow high quality cannabis for the casual smoker. It doesn’t include a tent, so assumes that you already have a closet or cabinet with good ventilation to grow in. To keep costs down, use a plastic cup for seedlings and an existing container or left over nursery pots. For under $175 USD, the budget kit can net 200 to 300 grams per square meter (2/3 to 1 ounce per square foot), depending on the strain. Not bad considering the startup costs.
Can I really grow weed in a closet?
Absolutely. In fact, you can grow some amazing weed in a closet with the right lights and enough ventilation. The Raspberry Cough below was grown from seed to harvest in a small coat closet with a single LED light and a small fan.
With enough airflow, closets make great grow spaces.
Grow Space – Bring Your Own
This budget kit is for people who already have a great place to grow and will work well for space of 24″x24″ (.5x.5M) and at least 4′ (1.2M) tall. You can use a large cabinet or a spare closet with good ventilation. Get creative, as long as your space meets these basic requirements:
Good Ventilation: Without good ventilation, the air in your grow space will become very humid and hot and lead to mold, disease and stress.
Heat Control: Cannabis likes the same temperature ranges as you do; too hot or too cold and the plant just shuts down and a good grow space keeps temperatures between 65F (18C) and 80F (27C) and never than 60F(15C) and never more than 90F (32C).
Light Control: Traditional photoperiod cannabis strains need over 12 hours of uninterrupted darkness in a 24 hour cycle to flower. Even a quick sweep of light can cause the plant to stop flowering. A good grow space for photoperiod strains can be completely backed out.
Vertical Space: Cannabis can get tall, from 1′ all the way to 20′ (6.6m) tall depending on strain. You will need to select a strain that will fit into your space and use topping and training to make the most efficient use of your space and lights. Remember that lights hang down at least 1 foot (.3M) and you will need to keep at least the same amount between the lights and canopy. A good grow space is at least 2′ (.6M) taller than the top of your plant after its done growing.
To learn more about picking an optimal grow space, check out our grow space guide.
Light – Under $90 USD
For growing in compact spaces, you need a light that doesn’t burn hot. LEDs are very efficient so they make a great choice for for keeping heat and costs down.
Two other important factors in a closet grow are stealth and safety. For those reasons, we highly recommend Mars Hydro TS 600W LED Grow Light. The high quality build will help prevent electical issues and the fanless architecture will keep your grow quiet.
Nutrients – $20 USD
Cannabis plants need macronutrients for basic building blocks in their rapid growth process. During the vegetation phase, nitrogen is very important and potassium is less important – though those roles reverse during flowering. Marijuana plants need micronutrients too, like iron, calcium, magnesium and zinc. Read our water and nutrient guide to get the details.
We recommend Humboldt’s Secret base nutrient system because it has professional results and is easy to use. Best of all, they offer an 8oz starter pack that will let you try it out without a heavy investment.
pH Balance Kit – $20 USD
You will want to test the pH every time you water to make sure the soil stays in the right pH range. Cannabis likes pH between 5.5 and 7 depending on the strain. See our Water and Nutrient guide to learn more about managing pH.
We use General Hydroponics pH control kit to test and balance pH. This solution is well buffered, pH stabilizes quickly and the included test kit is easy to use.
Soil – Under $20 USD
FoxFarm’s Ocean Forest soil drains well and is specifically pH balanced for cannabis. You can amend it with coco or use it as is.
Seed – Under $20 USD (including delivery)
You have two options for the types of seed to choose. The first is a photoperiod feminized seed that will produce heavier yields but requires your space have good light control for flowering. The second is a an autoflowering strains, which often have lower yields but light control isn’t an issue. Read more about cannabis strains and seeds here.
Total: Under $175 USD
This is a startup cost. Soil is an ongoing cost, but nutrients will last for several grows and the lights will last for over 50k hours.
What can I grow with this setup?
This setup has a maximum coverage of around 2.25 square feet (.2 sqare meters). The Afgan Mass from 00 seeds below was grown in a 18″x18″ (.45x.45 meters) converted stereo cabinet and netted around 40 grams of high-quality bud. Given current prices for recreational cannabis in Seattle, you will more than pay for the entire setup with the savings from one grow.
This plant is being grown in a small cabinet with reflective foil on the walls.
Adding more airflow can be as simple as adding fan as long as the closet it ventilated well enough. Adding ventilation to a space without good ventilation would mean adding a vent fan through the ceiling, walls, or door. Since this requires cutting a hole, it may not work for you.
Potassium is a basic element, and just like nitrogen and phosphorous, it is a critical component in almost every growth function in your plant. Potassium is the K in NPK and the plant absorbs it from the growing medium through the roots. There are a few simple rules to make sure your plant gets the right amount of potassium:
Potassium needs to be available in the growing medium in a form that cannabis can consume
The plant’s roots need to be healthy enough to uptake available potassium
The pH near the roots needs to be in the right range for cannabis to uptake the potassium.
Why do cannabis plants need potassium?
Cannabis is like all living things and requires potassium for normal growth and maturity. It is an important player in photosynthesis and in the regulation of plants responses to light through opening and closing of stomata. Potassium is also a crucial component for many other vital processes such as water and nutrient transportation, protein, and starch synthesis.
How do I diagnose potassium deficiency in cannabis?
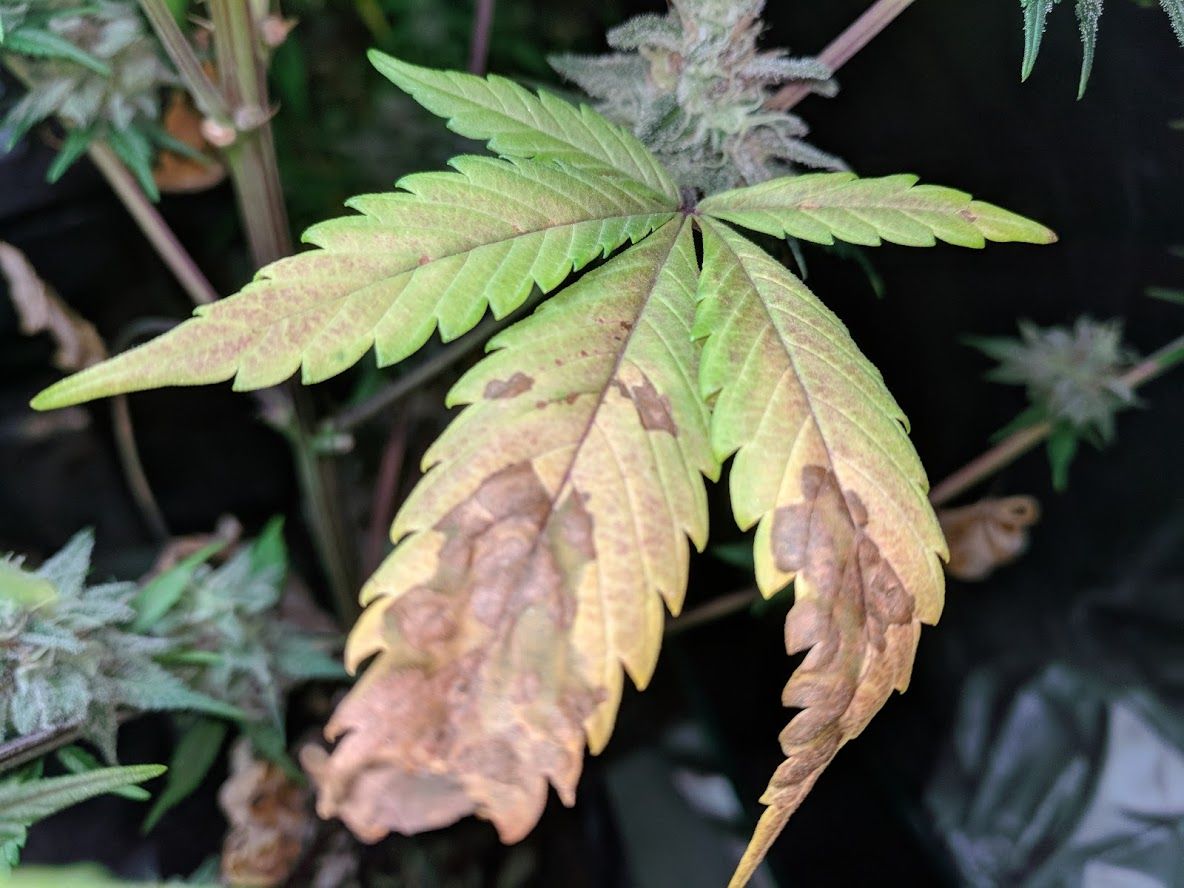
The easiest way to tell if your plant has healthy levels of potassium is to look at the older fan leaves at the bottom of the plant. Look for leaves that are turning yellow along the edges and at the tips. As the problem progresses, the tips and edges can look burned.
Normal Potassium Levels
Lower fan leaves on plants with healthy levels of potassium are dark green in color.
Low Potassium Levels
Leaves on plants with lower levels of potassium to turn yellow along the edges and on the tip.
Depleted Potassium Levels
Leaves on plants with depleted potassium develop burned edges.
What causes yellow and burned edges of cannabis leaves?
Cannabis leaves in healthy vegetative growth have green leaves due to high levels of green chlorophyll, which is used in photosynthesis to generate energy for the plant’s growth. If there isn’t enough potassium, the plant struggles to create enough chlorophyll. To optimize resources, pot plants will reroute potassium from older leaves at the bottom in favor of supplying the growth tips.
Vegging plants require moderate amounts of potassium, so a deficiency during vegging might indicate pH or root issues.
Flowering plants need increased levels of potassium in flower production. If it doesn’t have enough, it will begin diverting potassium from even the new growth leaves near the buds.
When cannabis leaves start to turn yellow and look burned along the edges, it often indicates a minor potassium deficiency
Is there potassium in the medium?
The easiest way to get potassium into the growing medium at the correct level is to use a balanced nutrients set. Using fertilizers and nutrients put all the required elements into the growing medium, so if you are using a nutrient system designed for cannabis, there is probably plenty of potassium available.
Are the plant’s roots healthy?
Root health is critical for the uptake of water and nutrients. If a plant is too big for its container, the plant can become root-bound. When this happens, the roots grow inward and can strangle themselves, slowing the plants nutrient uptake. Other root issues, like root-rot, will also impact the plants nutrient uptake.
Is the pH Balanced?
PH is short for ‘potential Hydrogen’ but is most often used to describe the acidity or alkalinity of a substance. This is important when growing cannabis because nutrients are not available for uptake by the plant outside fairly narrow pH ranges. Cannabis plants in soil do best between 6 and 7 while cannabis plants in coco or other soilless mediums do best between 5.5 and 6.5.
If the pH is too high or too low, then the nutrients aren’t available for the plant to uptake. This is called nutrient lockout because no matter how many nutrients you provide, the plant still can’t use them. This is a very common problem for farmers and the best way to combat it is to test the pH at every watering.
Nutrients are available at different pH ranges.
How do I correct potassium deficiency?
In most cases, you don’t need to worry about a few leaves on the bottom going yellow or getting splotches during vegetative growth. If you are seeing it in new growth during flowering, you should address the problem quickly, since cannabis needs increased amounts of potassium during flowering.
How do I check the pH?
There are two methods for checking the pH at the plant’s roots. The most common method is to water the plant until there is a runoff and then check the pH of the runoff water using a hand-held pH meter. If the pH that comes out is higher or lower than what you put in, then you know that it is unbalanced.
The second method uses a soil pH meter. These unit have probes that allow them to test the soil near the roots after a watering.
How do I balance the pH?
To balance the pH, flush with water until the runoff is in an acceptable range. After the pH near the roots is at the right level, follow up with a hearty dose of nutrients and the problem should be solved.
To correct a deficiency, aim for a pH of around 7 in the soil, or 6.5 in coco, to get the most potassium uptake. If you notice the yellowing continuing, you likely have a root condition. he pot is too small, transplant into a larger container.
If your plant’s roots are healthy and you’re using a balanced nutrient solution, you should check the pH of the soil. In most cases, balancing the pH and performing a feeding should prevent further problems.
Phosphorus is a basic element, and just like nitrogen and potassium, it is a critical component in almost every growth function in your plant. Phosphorous is the P in NPK and like most nutrients, the plant absorbs it from the growing medium through the roots. There are a few simple rules to make sure your plant gets the right amount of phosphorous:
Phosphorous needs to be available in the growing medium in a form that cannabis can consume
The plant’s roots need to be healthy enough to uptake available Phosphorous
The pH near the roots needs to be in the right range for cannabis to uptake the phosphorous.
Why do cannabis plants need phosphorous?
Cannabis is like all living things and requires phosphorus for normal growth and maturity. Phosphorus is a key ingredient in photosynthesis, respiration, energy storage and movement, cell division and growth and almost everything else the plant does.
How do I diagnose phosphorous deficiency in cannabis?
The easiest way to tell if your plant has healthy levels of phosphorous is to look at the older fan leaves at the bottom of the plant. Look for discoloration, spots and dark blotches that form between the veins. Often the leaves will feel stiff and dry to the touch.
Normal Phosphorous Levels
Lower fan leaves on plants with healthy levels of phosphorous are dark green in color.
Low Phosphorous Levels
Leaves on plants with lower levels of phosphorous start darken with darker blotches and may feel stiff.
Depleted Phosphorous Levels
Leaves on plants with depleted phosphorous develop large blotches and rust spots and may turn yellow or develop a bronze sheen.
What causes blotches on cannabis leaves?
Cannabis leaves in healthy vegetative growth have green leaves due to high levels of green chlorophyll, which is used in photosynthesis to generate energy for the plant’s growth. If there isn’t enough phosphorous, the plant struggles to create enough chlorophyll. To optimize resources, pot plants will reroute phosphorous from older leaves at the bottom in favor of supplying the growth tips.
When vegetating cannabis leaves at the bottom of the plant develop dark blotches, it often indicates a minor phosphorous deficiency
Flowering plants need increased levels of phosphorous in flower production. If it doesn’t have enough, it will begin diverting phosphorous from even the new growth leaves near the buds.
Flowering requires a lot of phosphorous and the plant will divert supplies from nearby leaves to bolster flower production.
Is there phosphorous in the medium?
The easiest way to get phosphorous into the growing medium at the correct level is to use a balanced nutrients set. Using fertilizers and nutrients put all the required elements into the growing medium, so if you are using a nutrient system designed for cannabis, there is probably plenty of phosphorous available.
Are the plant’s roots healthy?
Root health is critical for the uptake of water and nutrients. If a plant is too big for its container, the plant can become root-bound. When this happens, the roots grow inward and can strangle themselves, slowing the plants nutrient uptake. Other root issues, like root-rot, will also impact the plants nutrient uptake.
Is the pH Balanced?
PH is short for ‘potential Hydrogen’ but is most often used to describe the acidity or alkalinity of a substance. This is important when growing cannabis because nutrients are not available for uptake by the plant outside fairly narrow pH ranges. Cannabis plants in soil do best between 6 and 7 while cannabis plants in coco or other soilless mediums do best between 5.5 and 6.5.
If the pH is too high or too low, then the nutrients aren’t available for the plant to uptake. This is called nutrient lockout because no matter how many nutrients you provide, the plant still can’t use them. This is a very common problem for farmers and the best way to combat it is to test the pH at every watering.
Nutrients are available at different pH ranges.
From the chart above, you can see why phosphorous deficiency is one of the first signs that your pH might be low.
How do I correct phosphorous deficiency?
In most cases, you don’t need to worry about a few leaves on the bottom going yellow or getting splotches during vegetative growth. If you are seeing it in new growth during flowering, you should address the problem quickly, since cannabis needs increased amounts of phosphorous during flowering.
If your plant’s roots are healthy and you’re using a balanced nutrient solution, you should check the pH of the soil. In most cases, balancing the pH and performing a feeding should prevent further problems.
How do I check the pH?
There are two methods for checking the pH at the plant’s roots. The most common method is to water the plant until there is a runoff and then check the pH of the runoff water using a hand-held pH meter. If the pH that comes out is higher or lower than what you put in, then you know that it is unbalanced.
The second method uses a soil pH meter. These unit have probes that allow them to test the soil near the roots after a watering.
How do I balance the pH?
To balance the pH, flush with water until the runoff is in an acceptable range. After the pH near the roots is at the right level, follow up with a hearty dose of nutrients and the problem should be solved.
To correct a deficiency, aim for a pH of around 7 in soil, or 6.5 in coco, to get the most phosphorous uptake. If you notice the yellowing continuing, you likely have a root condition. If the pot is too small, transplant into a larger container.
Cannabis is like most plants and needs ample nitrogen during vegetative growth. Nitrogen is a basic component in chlorophyll, so its required for photosynthesis that powers plant growth. As if energy production wasn’t important enough to plant growth, plant proteins (including DNA and RNA) also require nitrogen.
There are a few simple rules to make sure your plant gets the right amount of nitrogen:
Nitrogen needs to be available in the growing medium in a form that cannabis can consume
The plant’s roots need to be healthy enough to uptake available nitrogen
The pH near the roots needs to be in the right range for cannabis to uptake
Nitrogen is extremely important during vegetative growth, but marijuana plants need much less during flowering. Excessive nitrogen can inhibit flower production, so most cannabis feeding schedules reduce nitrogen during the flowering phase. As a result, many cannabis plants appear nitrogen deficient during the end of the flowering phase. This is normal and not generally a problem, though you should still check to make sure it isn’t being caused by pH problems.
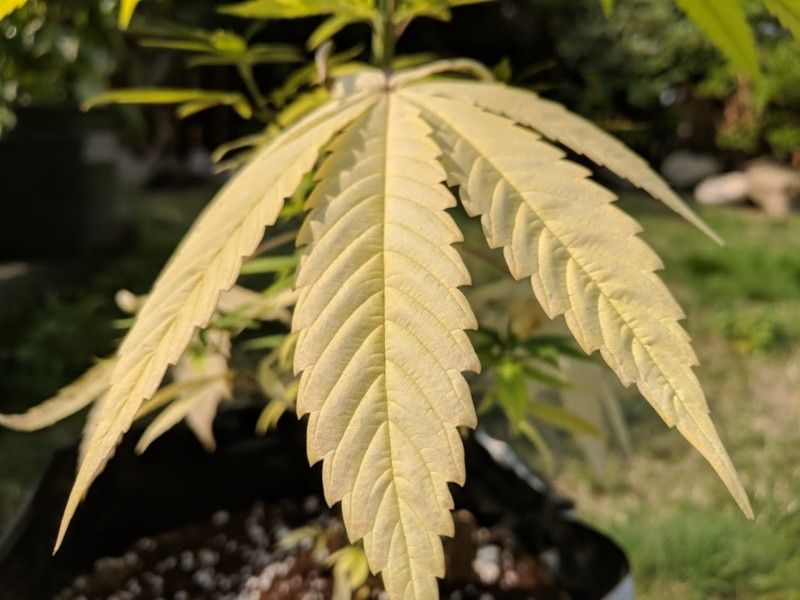
Cannabis leaves often turn yellow towards the end of flowering – this is normal even in healthy plants.
How do I diagnose nitrogen deficiency in cannabis?
The easiest way to tell if your plant has healthy levels of nitrogen is to look at the fan leaves:
Normal Nitrogen Levels
Lower fan leaves on plants with healthy levels of nitrogen are dark green in color.
Low Nitrogen Levels
Leaves on plants with lower levels of nitrogen start to turn yellow from the tips down.
Depleted Nitrogen Levels
Leaves on plants with depleted nitrogen turn completely yellow
Why do cannabis leaves turn yellow?
Cannabis leaves in healthy vegetative growth have green leaves due to high levels of green chlorophyll, which is used in photosynthesis to generate energy for the plant’s growth. If there isn’t enough nitrogen, the plant struggles to create enough chlorophyll. To optimize resources, pot plants will reroute nitrogen from older leaves at the bottom in favor of supplying the growth tips.
When cannabis yellows from the bottom up, it often indicates a nitrogen deficiency
Is there nitrogen in the medium?
The easiest way to get nitrogen into the growing medium at the correct level is to use a balanced nutrients set. Using fertilizers and nutrients put all the required elements into the growing medium.
Are the plant’s roots healthy?
Root health is critical for the uptake of water and nutrients. If a plant is too big for its container, the plant can become root-bound. When this happens, the roots grow inward and can strangle themselves, slowing the plants nutrient uptake. Other root issues, like root-rot, will also impact the plants nutrient uptake.
Is the pH Balanced?
PH is short for ‘potential Hydrogen’ but is most often used to describe the acidity or alkalinity of a substance. This is important when growing cannabis because nutrients are not available for uptake by the plant outside fairly narrow pH ranges. Cannabis plants in soil do best between 6 and 7 while cannabis plants in coco or other soilless mediums do best between 5.5 and 6.5.
If the pH is too high or too low, then the nutrients aren’t available for the plant to uptake. This is called nutrient lockout because no matter how many nutrients you provide, the plant still can’t use them. This is a very common problem for farmers and the best way to combat it is to test the pH at every watering.
Nutrients are available at different pH ranges.
How do I correct nitrogen deficiency?
In most cases, you don’t need to worry about a few leaves on the bottom going yellow during vegetative growth. In flowering, it is very common for many leaves to turn yellow. lowering nitrogen during flowering growth.
If your plant’s roots are healthy and you’re using a balanced nutrient solution, you should check the pH of the soil. In most cases, balancing the pH and performing a feeding should prevent further yellowing.
How do I check the pH?
There are two methods for checking the pH at the plant’s roots. The most common method is to water the plant until there is a runoff and then check the pH of the runoff water using a hand-held pH meter. If the pH that comes out is higher or lower than what you put in, then you know that it is unbalanced.
The second method uses a soil pH meter. These unit have probes that allow them to test the soil near the roots after a watering.
How do I balance the pH?
To balance the pH, flush with water until the runoff is in an acceptable range. After the pH near the roots is at the right level, follow up with a hearty dose of nutrients and the problem should be solved.
To correct a deficiency, aim for a pH of around 7 in soil, or 6.5 in coco, to get the most nitrogen uptake. If you notice the yellowing continuing, you likely have a root condition. If the pot is too small, transplant into a larger container.